Description
This guide will go through the needed steps to configure the L2TP/IPsec functionality in cOS Core in order to connect with the built in VPN client in Windows 10. The L2TP/IPsec server can be used by other operating systems as well as long as the follow the same standards and needed encryption algorithms.
Note: The L2TP/IPsec solution is still a viable VPN type but it is starting to be considered “old” in terms of encryption algorithms. After 2025 it would be recommended to gradually start to phase it out and instead use the IKEv2 client or Clavister OneConnect. If you are reading this guide for a new VPN tunnel setup, it might be a good idea to go directly to use IKEv2 and/or OneConnect instead.
Preparing configuration objects
First of all we need to create all needed objects.
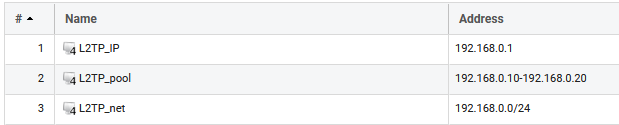
Objects > Address Book
The first thing to do is to add all objects needed by the L2TP tunnel. The Network, the IP range the clients will use and the “interface IP” of the tunnel.
When this is done, you should have three new objects in the address book. It should look something like this:
Proposal Lists
We create two proposal lists, one for IKE and one for IPsec. Select SHA1 and AES as algorithms. This is to match the incoming proposals sent from Windows. This is done under Objects -> VPN Objects -> IKE/IPsec Algorithms
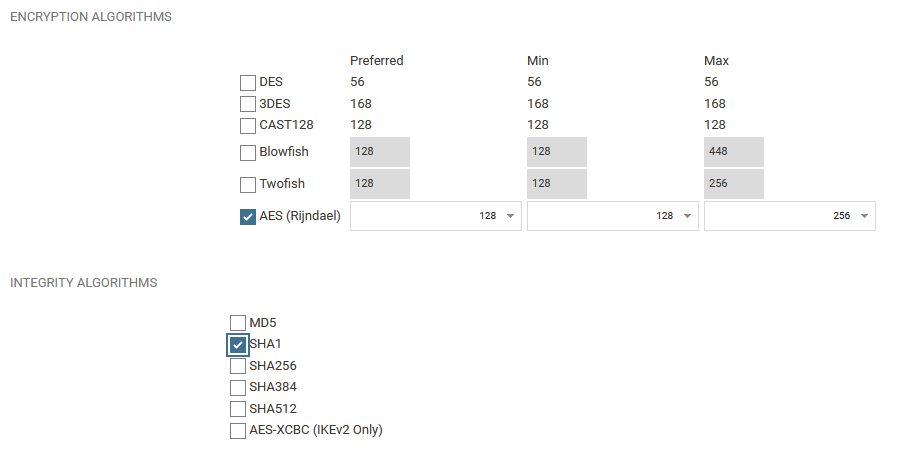
Note: The proposals sent to the Clavister varies depending on the operating system that connects. For example Android and iOS proposes more secure algorithms to be used in the IKE Phase (Phase-1), such as SHA256. We recommend using the more secure algorithms when connecting to IPsec from these OS’s.
Preparing the Pre-Shared Key
To be able to authenticate the IPsec tunnel that will be used for the L2TP tunnel, a pre-shared key needs to be defined. This is done under Objects -> Key Ring -> Pre-Shared Keys.
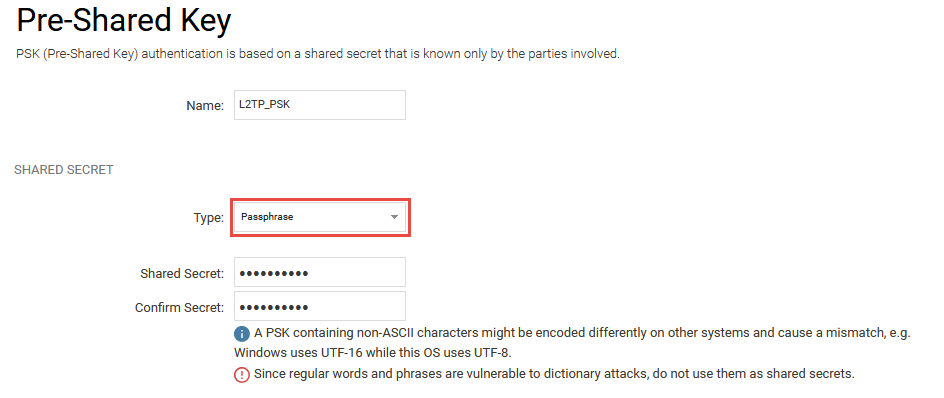
In this How-to a pre-shared key named L2TP_PSK will be used.
Preparing a new Local User Database
To be able to authenticate the users using the L2TP tunnel a local user database will be used, this can of course also be a RADIUS server. Create a new database under System -> Users -> Local User Databases .
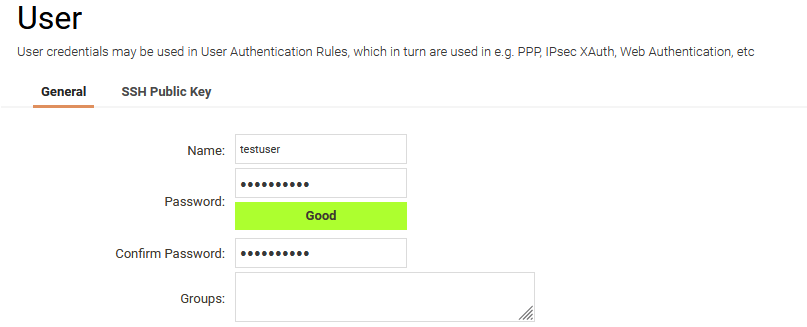
In this How-to, a user database named L2TP will be used.
Add a few users to this database. There is no need to define groups to get L2TP up and running. But groups could later be used in the policies to setup different policies based on group membership.
Setting up the IPsec Tunnel
Now it’s time to set up the IPsec tunnel, this is done in the IPsec Tunnels section located in the Network tab of the Security Gateway. The example screenshot above shows the Clavister Firewall (cOS Core).
General settings
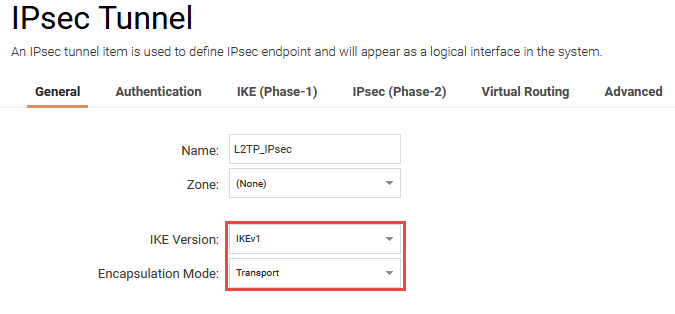
Name
First of all, a name is needed for the VPN connection. This virtual interface will later be used in the L2TP section.
In this example, the name L2TP_IPsec is being used.
IKE Version
Select IKEv1 as version.
Encapsulation mode
As we’re setting up L2TP this should be set to Transport Mode.
Authentication
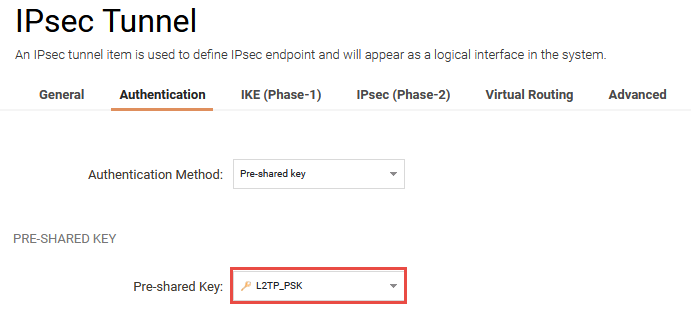
As authentication method, choose Pre-Shared Key. In the Pre-Shared Key drop-down list, select the Pre-Shared Key you created previously in the Pre-Shared Key section.
IKE Phase 1
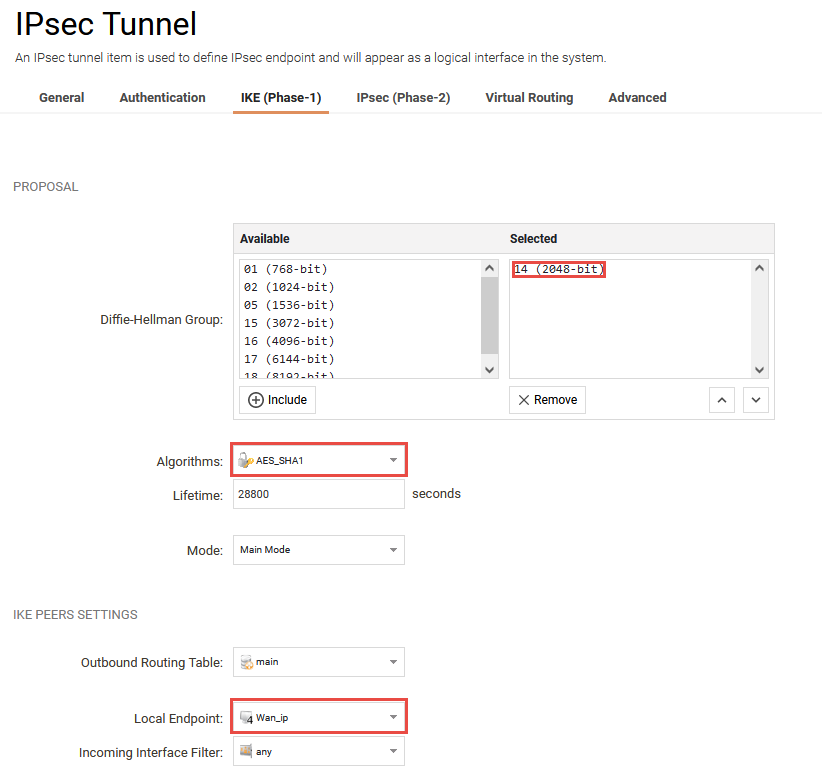
Diffie-Hellman group
Here we select DH-Group 14(2048-bit) since that is the most secure proposal group sent by Windows 10.
NOTE: If you want to use an Android device you must select DH-Group 02(1024-bit) as well.
Algorithms
Here we select the IKE algorithm that we created earlier.
We leave the life-time to it’s default value.
Local Endpoint
In this scenario we’re assuming that our connection attempts are from the outside so we select our Wan_IP
Note: When the SGW is behind a NAT:ing device, Local Endpoint should be all-nets because of the incorrect local ID that will be sent due to the SGW being behind NAT.
All other settings can be left to it’s default value.
IKE Phase 2
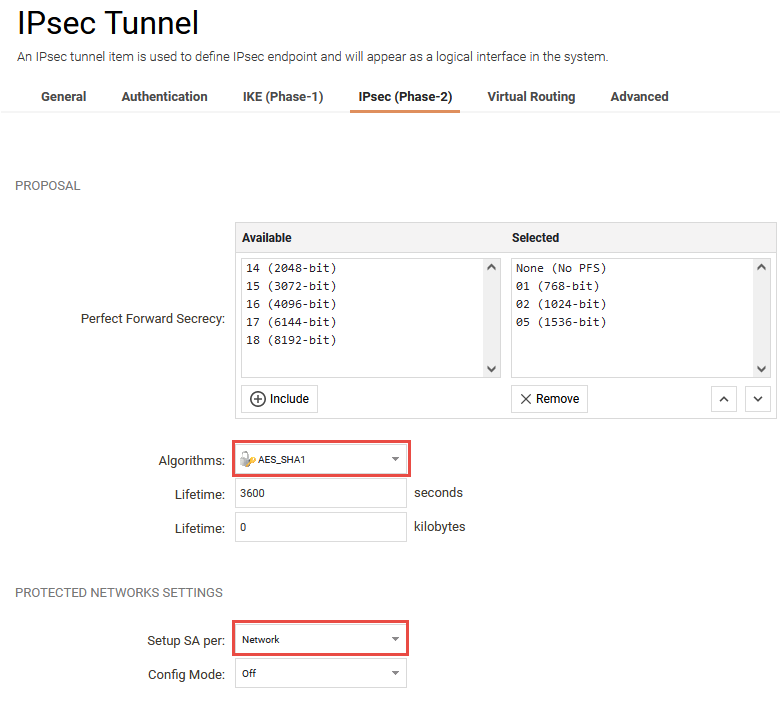
Algorithms
Here we select the IKE algorithm that we created earlier.
Setup SA per:
Note: Make sure that you have selected Network in this section.
Advanced tunnel settings
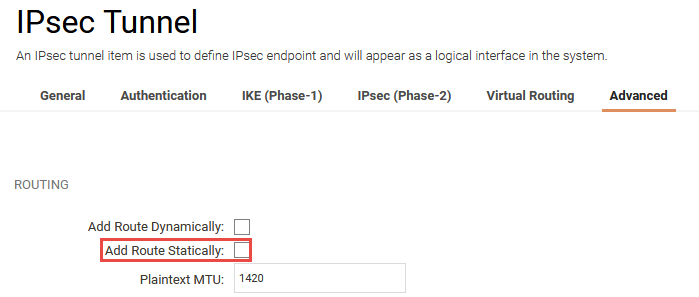
Static route is enabled by default on the IPsec tunnel. This should be disabled. This is because the L2TP Tunnel will do the routing.
Setting up the L2TP Tunnel
Now it’s time to setup the L2TP Server, this is done in the PPTP/L2TP Servers section located in the Network folder of the Security Gateway.
General settings
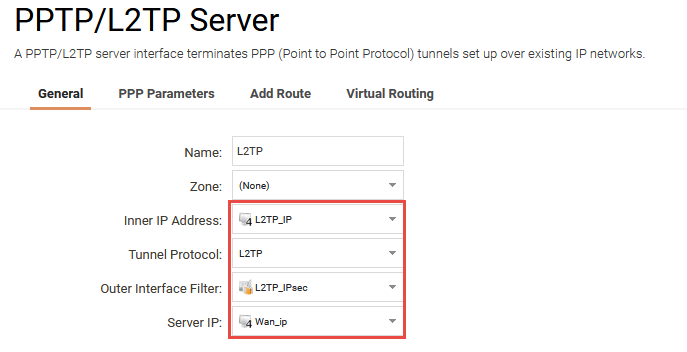
Name
First of all, a name is needed for the L2TP interface. This virtual interface will be used later in the policies and user authentication rules sections.
In this example, the name L2TP is being used.
Inner IP Address
This IP should be a part of the network which the clients are assigned IP addresses from, in this case it should be L2TP_ip (192.168.0.1).
Tunnel Protocol
As we are setting up a L2TP server, L2TP is selected as Tunnel Protocol.
Outer Interface Filter
This is the interface that the L2TP server will accept connections on. As IPsec is used when running L2TP from Windows 10, the interface should be the IPsec tunnel, created earlier L2TP_IPsec.
Server IP
This is the IP that the L2TP server is accepting connections on. It should be the same as the IPsec tunnel endpoint, i.e. Wan_ip.
PPP Parameters tab
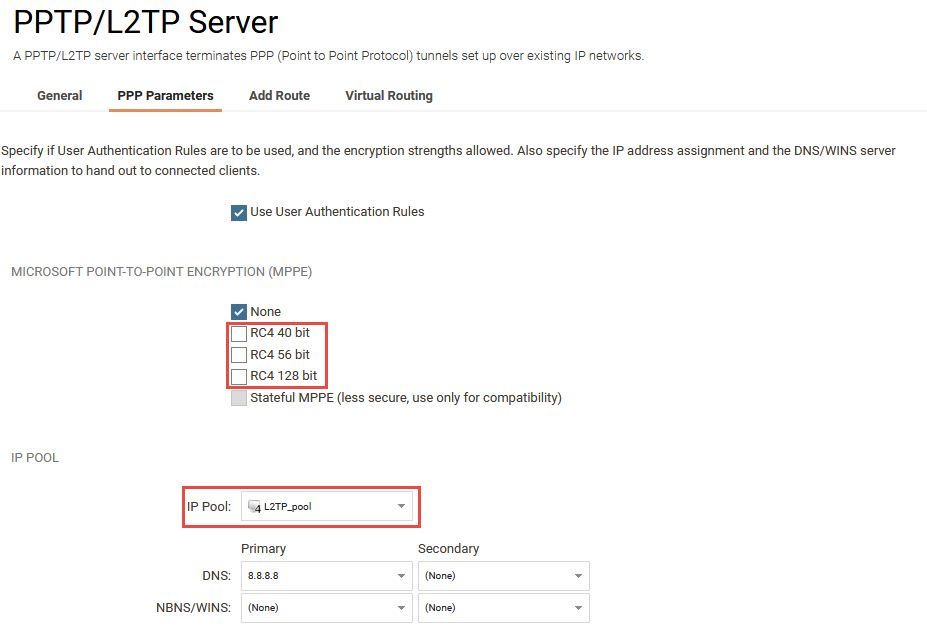
Authentication
Should be enabled, and a rule needs to be configured, (as described further down “Setting up the User Authentication Rule”).
Microsoft Point-to-Point Encryption
Select the encryption strength the server should allow.
Note: The recommendation is to ONLY have None checked. Disable the 40/56/128 bit encryption.
We already have IPsec encryption, there is no need to encrypt once more, and MPPE is not hardware accelerated, meaning that throughput and CPU usage will suffer. IPsec is hardware accelerated on certain models which gives vastly improved performance.
IP Pool
Specify the addresses that are to be assigned to the clients. In this case, use the pool created earlier, L2TP_pool. You can also specify up to two DNS and WINS servers.
Add Route tab
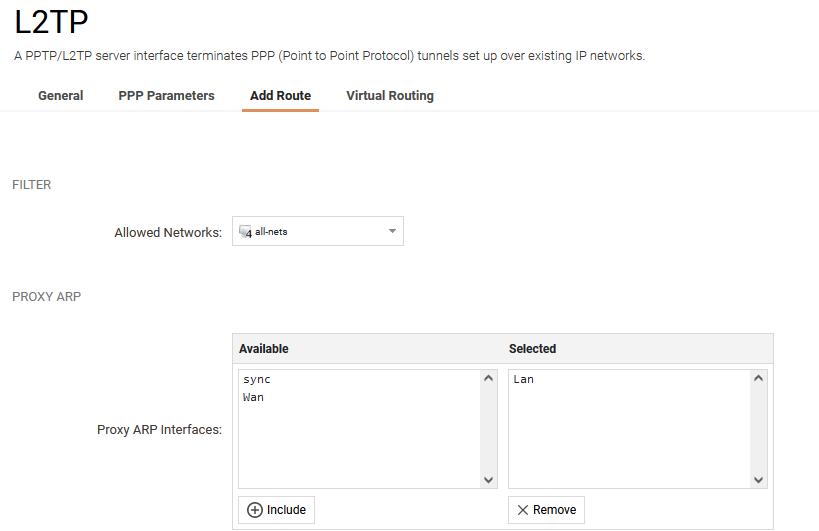
A ProxyARP needs to be configured for the IP’s used by the L2TP Clients. What we do is publish the IP’s from the L2TP_pool on Lan and the L2TP server will automatically route them over the L2TP_tunnel interface.
Virtual Routing
The L2TP Server will automatically add routes to the L2TP Clients and route them over the L2TP_tunnel interface. Select which routing table those routes should be added to. In this guide we will use main which is the ordinary routing table.
Setting up the User Authentication Rule
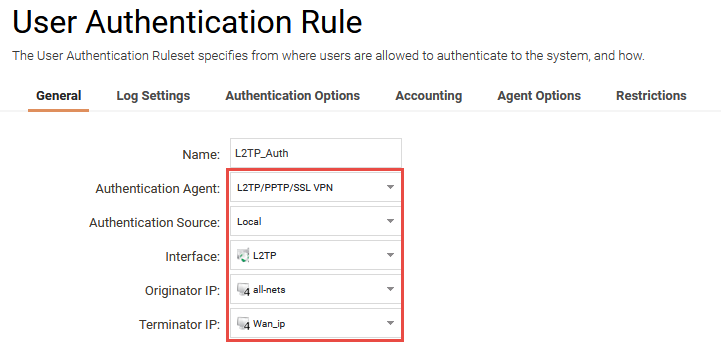
A user authentication rule needs to be configured as below:
Name: L2TP_Auth
Authentication Agent: L2TP/PPTP/SSL_VPN (As we’re using an L2TP tunnel)
Authentication Source: Local (Since we are using an local database)
Interface: L2TP_tunnel(This should be the L2TP server)
Originator IP: all-nets (As the clients are roaming)
Terminator IP: Wan_ip (Should be the same as the Outer IP)
Local User DB: L2TP (This Option is under the Authentication Options tab)
The rule should look like in the below screenshot:
Setting up the Policies
When the other parts are done, all that is left are the policies. To let traffic trough from the tunnel two policies should be added, the first one with the following characteristics:
Name: L2TP_out
Action: Allow
Source Interface: L2TP_tunnel
Source Network: L2TP_pool
Destination Interface: Wan
Destination Network: all_nets
Service: all_services
Source Translation: NAT
The second policy should have the following characteristics
Name: L2TP_to_Lan
Action: Allow
Source Interface: L2TP_tunnel
Source Network: L2TP_pool
Destination Interface: Lan
Destination Network: LAN_net
Service: all_services
Note: As it is a policy towards the internet it is recommended to narrow the service down as much as possible.

Windows 10 - Setting up the VPN connection
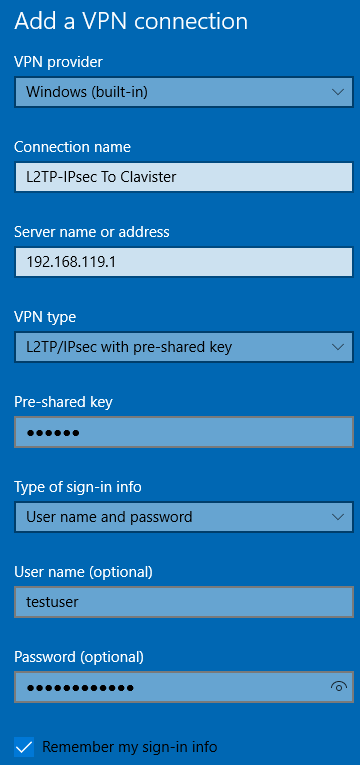
To setup the new L2TP/IPsec network connection in Windows 10, in Settings press Network & Internet -> VPN -> Add a VPN connection, then enter the information for the L2TP/IPsec connection.
VPN provider
Choose “Windows (built in)”.
Connection name
Give the VPN connection a name.
Server name or address
Type in the hostname or IP of the Clavister Security Gateway you are connecting to. The IP Shown in the picture is the IP of our WAN interface, i.e Wan_IP.
VPN type
Since we want to set up a L2TP/IPsec connection we choose “L2TP/IPsec with pre-shared key”.
Type of sign-in info
Since we want to authenticate with the local users we created, choose Username and password.
Username (optional)
Here you enter the Username of the user you want to connect as, in this example we use the user we created earlier, testuser. This is optional, if you don’t fill this in you will get a pop-up asking for your username and password.
Password (optional)
Here you enter the password matching with the user you want to connect as. This is also optional, in the same way as the username.
Related articles
24 Mar, 2023 core ipsec ippool dhcp
12 Apr, 2023 core proxyarp arp ipsec routing
18 Mar, 2024 core certificate oneconnect ipsec vpn
2 Jul, 2026 vpn core ipsec alg highavailability trafficshaping
23 Nov, 2022 core ipsec
21 Feb, 2023 ipsec certificate windows ca core
22 Mar, 2021 core ipsec routing
18 Mar, 2024 core incontrol certificate oneconnect ipsec vpn
11 Dec, 2025 core routing ospf ipsec
17 Jun, 2021 core ipsec routing
8 Mar, 2023 core l2tp ipsec
20 Feb, 2023 core vpn ipsec
4 Aug, 2023 core ipsec troubleshoot ike
14 Apr, 2021 core license ipsec
8 Sep, 2020 core ipsec rules access
29 Mar, 2023 ipsec core windows vpn l2tp
5 Apr, 2023 ipsec core
16 Sep, 2020 vpn ipsec ikev2 windows howto dh
7 Dec, 2022 ipsec ike troubleshoot core
14 Dec, 2022 core ipsec
5 Apr, 2023 core nps ipsec radius legacy
14 Mar, 2023 core ipsec vpn ikev2 certificate
23 Aug, 2022 core ipsec license memory
15 Mar, 2023 core ipsec ipv6
23 Aug, 2022 core connections ipsec memory
13 Feb, 2023 ipsec core routing failover
28 Mar, 2023 dhcp ipsec core