Objectives of this Article:
This how-to article details the steps to fully configure Windows IKEv2 roaming clients with certificate generation being done by a Clavister NetWall firewall, without any third party involvement. Note that Windows 10 or later is assumed.
The article contents will continue to be updated and expanded with additional information as required.
Steps covered:
- How to generate CA certificate using the cOS Core WebUI
- How to generate the CA signed Gateway certificate using the cOS Core WebUI
- How to set up roaming IKEv2 tunnel using a Roaming VPN profile
- How to Configure the DNS client
- How to set up the Windows built-in VPN client
1. How to generate CA certificate using the cOS Core WebUI
To generate the CA certificate, go to “Objects->Key Ring->Add->Certificate->Generate Certificate->Configure”:
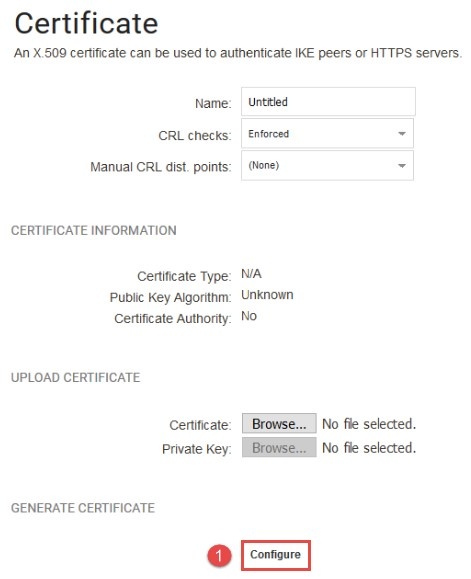
*Figure 1.0.1 Configure the CA certificate *
(1) Configure the CA certificate.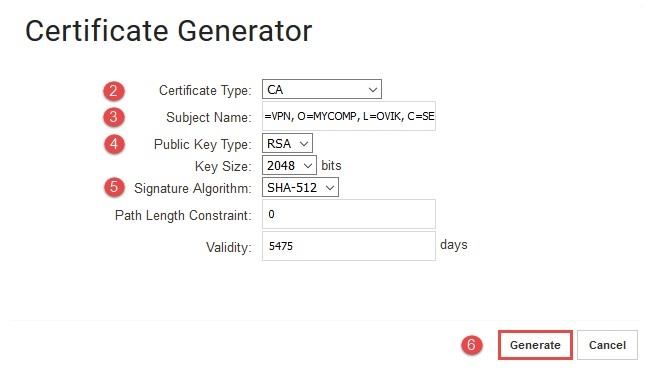
*Figure 1.1.1 Generate the CA certificate *
Warning: Generating certificates is CPU intensive and generating the certificate below might cause the NetWall firewall to pause other processing for a brief period.
(2) Input the certificate type as CA certificate.
(3) Replace the subject name with something suitable for the organization.
(CN= common name, OU=organizational unit, O=company name, L=province, C=country).
(4) Choose the public key type, in this example we will be using RSA with key size of 2048 bits.
(5) Choose the suitable signature algorithm for configuration, in this example we will be using SHA-512. This should result in a certificate like the one shown in *Figure 1.2.1 * .
(6) Generate CA certificate. 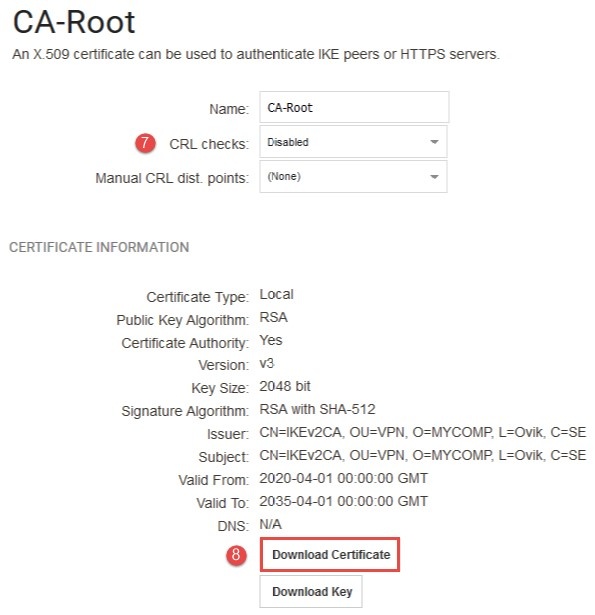
*Figure 1.2.1 Download the CA certificate *
(7) Disable CRL checks (the firewall cannot perform CRL checks).
(8) Download and save the certificate. This needs to be loaded into the Windows client’s certificate store, but only the certificate, not the key.
2. How to generate the CA signed Gateway certificate using the cOS Core WebUI
To generate the CA signed gateway certificate, go to “Objects->Key Ring->Add->Certificate->Generate Certificate->Configure”:
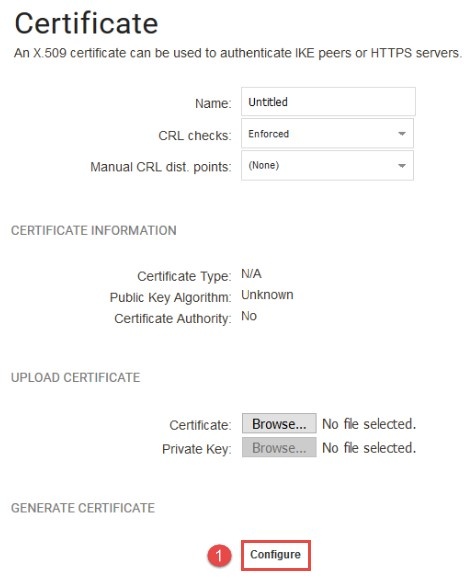
*Figure 2.0.1 Configure the gateway certificate *
(1) Configure the gateway certificate.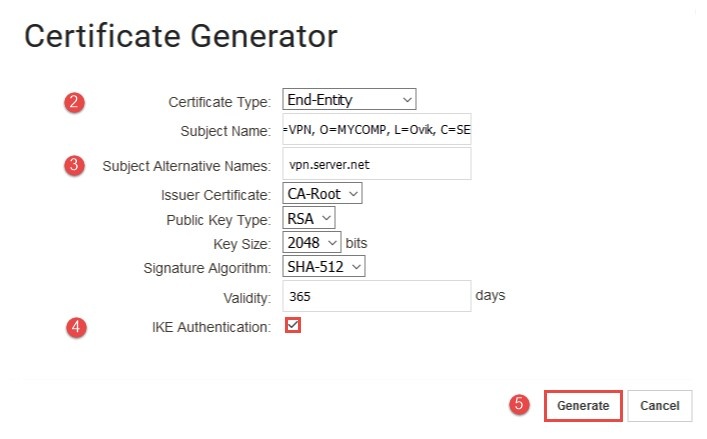
*Figure 2.1.1 Generate the gateway certificate *
(2) Select the certificate type as End-Entity certificate.
(3) Replace the subject name with something suitable for the organization. Note that the CN should not be the same as CN on the root certificate and the Subject Alternative Name needs to resolve to the public IP of the IKEv2 Server (the firewall). This should result in a certificate like that shown in *Figure 2.2. *
(4) Very important: Enable the IKE Authentication option in the gateway certificate.
(5) Generate the gateway certificate. 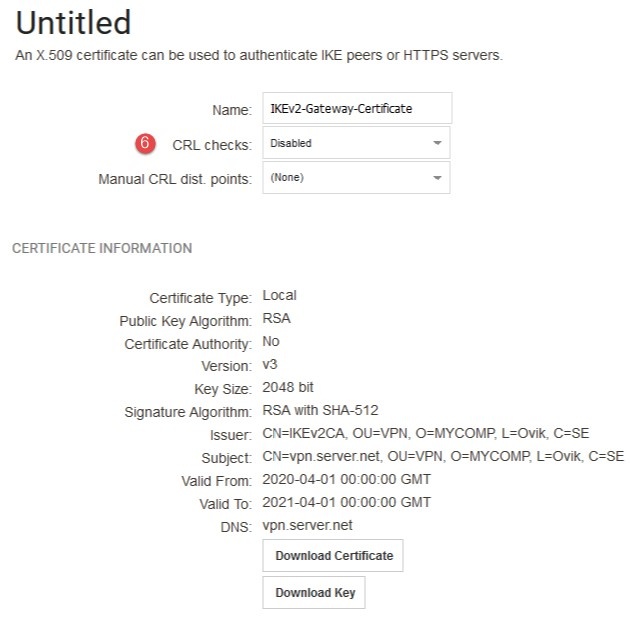
*Figure 2.2.1 The gateway certificate information *
(6) Disable CRL checks (the firewall cannot perform CRL checks).
3. How to set up roaming IKEv2 tunnel using a Roaming VPN profile
To set up the IKEv2 server interface, go to “Network->Interfaces and VPN->VPN AND TUNNELS->IPsec->Add->Roaming VPN (Simplified)”:
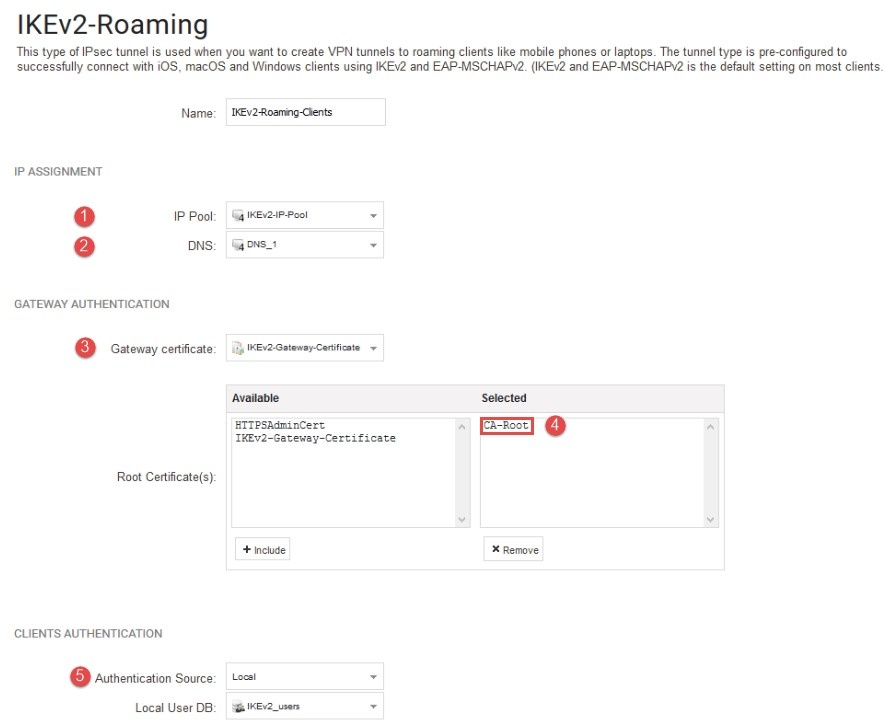
*Figure 3.0.1 Setup the IKEv2 server interface *
(1) Enter the pre-defined IP Pool object which consists of the IP leases to be handed out.
(2) The DNS address is the address of the DNS server we want the connected IKEv2 roaming client to use. We will use our external DNS server that we
received from our ISP, but it could be an internal DNS server. It is up to the administrator to decide, depending on the scenario.
(3) Select the IKEv2 gateway certificate.
(4) Select the pre-defined CA certificate as the root certificate.
(5) A local User Database means that the user database is stored in the cOS Core configuration file directly without the need to contact any
external server as with Radius or LDAP. By default there exists one pre-defined local data base called“AdminUsers”. This database is the
database used when connecting to cOS Core using SSH or the WebUI. We can use this database if we so choose, but it would be much better to
create a new local database that is specifically used for our roaming clients (also we do not want our VPN users to be able to login to the WebUI
of the Firewall).
4. How to Configure the DNS client
Go to “System->DEVICE SETTINGS->DNS”:
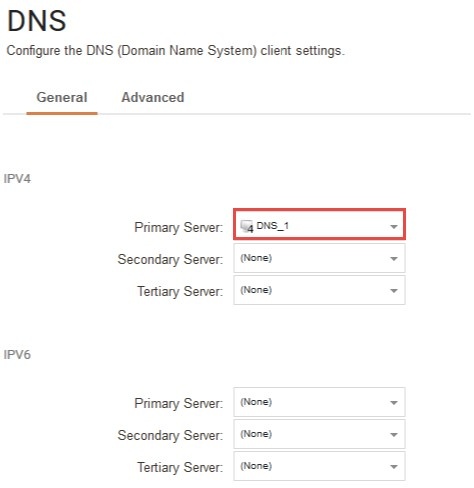
*Figure 3.1.1 Configure the DNS client settings * .
To accomplish DNS resolution, cOS Core has a built-in DNS client that can be configured to make use of up to three external IPv4 and/or IPv6 DNS servers. These are called the Primary Server, the Secondary Server and the Tertiary Server. For DNS to function, at least the one (the primary) server must be configured. It is recommended to have at least two servers (a primary and a secondary) defined so that there is always a backup server available.
5. How to set up the Windows built-in VPN client
We need to create the new VPN connection as shown by in the screenshot below:
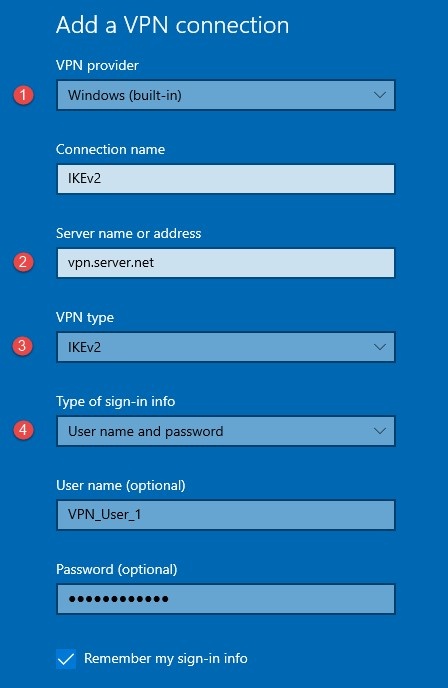
*Figure 4.0.1 Setup windows built-in VPN client *
(1) Select “Windows (built-in)” as VPN provider.
(2) Important: Enter the pre-defined VPN server name exactly as set in “Subject Alternative Name” of the gateway certificate (see *Figure 2.1.1). *
(3) Select IKEv2 as the “VPN type”.
(4) Enter the “User name” and “Password” for authentication that will match a pre-defined user in cOS Core’s local user database (IKEv2-users).
Important: Remember to add the CA certificate (downloaded previously in *Figure 1.2.1 * ) to the local client computer using Microsoft management as described in: https://support.securly.com/hc/en-us/ar … on-Windows
Related articles
10 Mar, 2023 core vpn ikev2 windows radius certificate
28 Mar, 2023 ikev2 windows vpn routing splittunneling
18 Mar, 2024 core certificate oneconnect ipsec vpn
2 Feb, 2021 core sslvpn macos certificate
21 Feb, 2023 ipsec certificate windows ca core
18 Mar, 2024 core incontrol certificate oneconnect ipsec vpn
18 Mar, 2024 onetouch sslvpn oneconnect troubleshoot certificate
23 Jan, 2024 core howto certificate management letsencrypt
16 Sep, 2020 vpn ipsec ikev2 windows howto dh
14 Mar, 2023 core ipsec vpn ikev2 certificate
11 May, 2023 oneconnect certificate howto