Introduction
This guide will describe how to get IKEv2 working using the 3rd party program called XCA to generate the needed Certificates and to use FreeRADIUS as the user authentication database with EAP (Enhanced Authentication Protocol) support. The following should be noted:
- It is possible to use the Local User Database in cOS Core as well which has support for EAP in newer versions (cOS Core version 11.00.xx and up).
- It is possible to use the firewall or InControl to generate the needed certificates in newer versions of cOS Core (version 14.00.xx and up). Neither the firewall or InControl can, however, be a repository of CRL (Cerfificate Revocation Lists). A knowledge base article that explains more about this scenario can be found here : https://kb.clavister.com/324736172/roaming-windows-ikev2-setup-with-netwall-as-ca-server
This guide is primary intended for internal lab environments when testing IKEv2 since we will not use CRL (Certificate Revocation Lists). It will, however, provide details on how to configure the NetWall firewall and how to import the certificates into the correct certificate store when importing them in Windows 10.
XCA
XCA is a certificate and key management software tool created by Christian Hohnstädt (christian@hohnstaedt.de) and can be downloaded with documentation from the following webpage:
https://www.hohnstaedt.de/xca/
Creating the Root Certificate
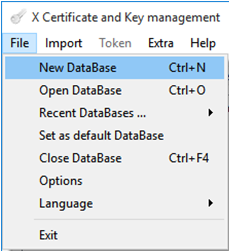
When XCA is installed, start the program and create a New Database, as show below below.
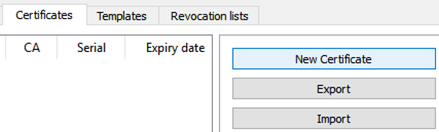
Select New Certificate.
Then select CA template and press Apply All.

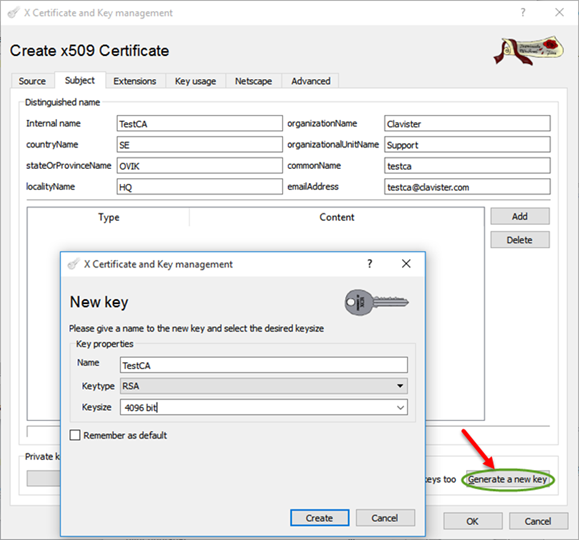
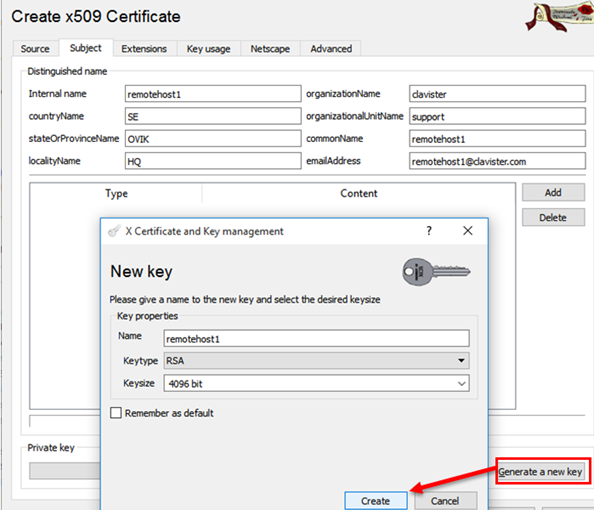
Enter Distinguished name information and create a 4096 bit RSA key.
Select Certificate Authority as Type, uncheck the Critical and Subject Key Identifier options. Change the time range validity of the certificate depending on your requirements then input the x509v3 Subject Alternative Name.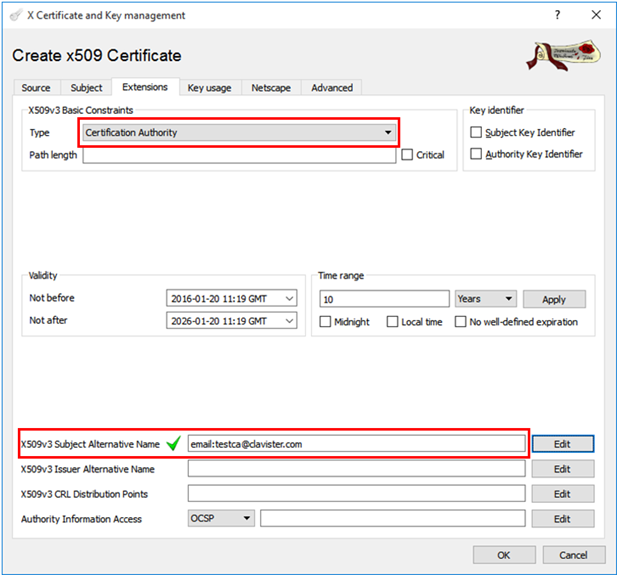
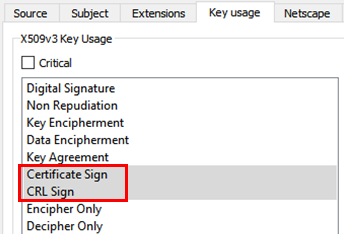
Make sure that Certificate Sign and CRL Sign is selected, as shown below.
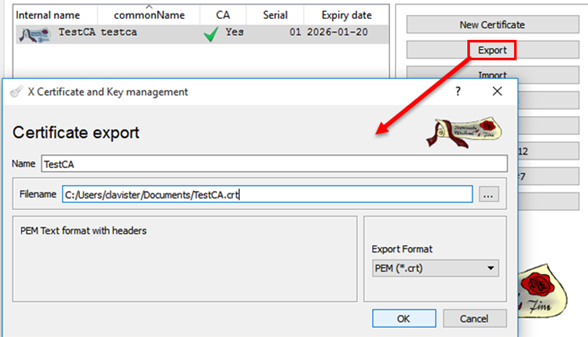
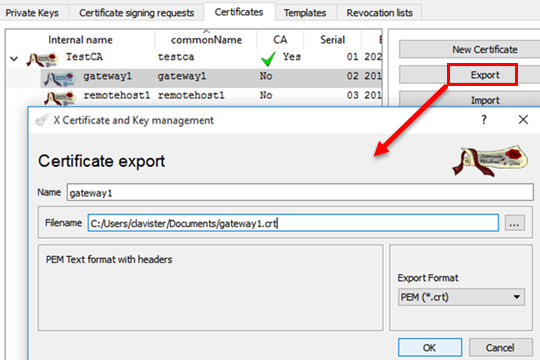
Export the Certificate as a PEM (.crt) file.
Creating the Gateway Certificate
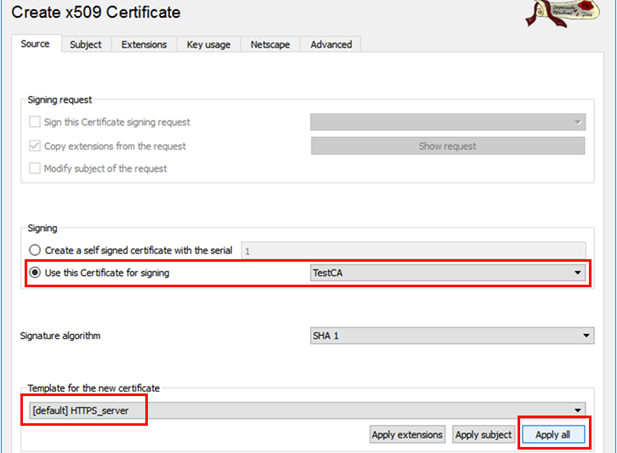
When creating the Gateway Certificate (the certificate that the firewall uses to authorize itself towards the connecting client) we will use our previous created Root certificate to sign it. Basically, all certificates must be signed by the same CA root server certificate in order to have a valid and intact certificate chain. We also must select “HTTPS_Server” as the template since we act as a server in this scenario. Make sure to press “apply All” to copy all the template properties to our certificate.
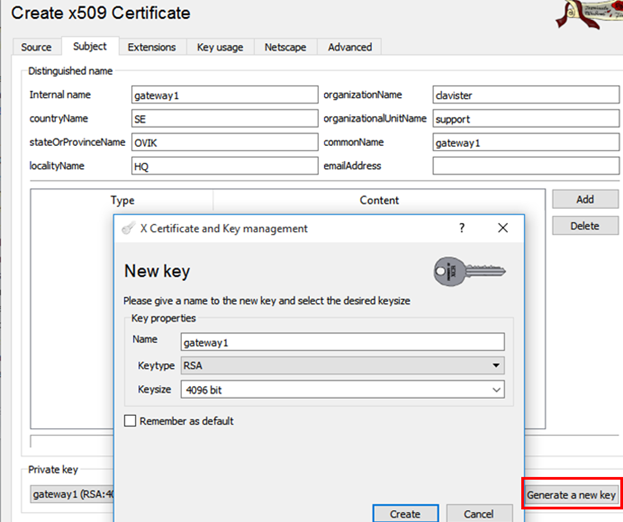
Enter Distinguished name information and create a 4096 bit RSA key.
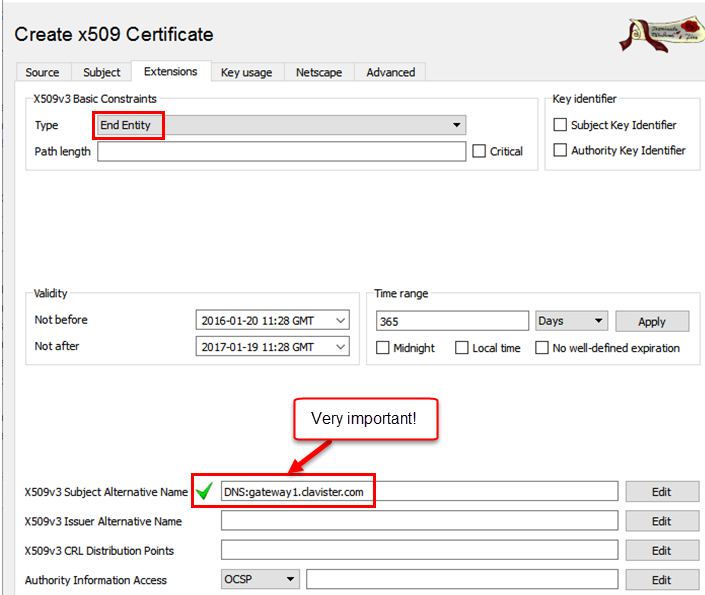
Enter a x509v3 Subject Alternative Name using a DNS URL.
IMPORTANT NOTE: This URL must resolve to the IP address that our firewall IKEv2 server is configured on. When the client connects, this is the exact DNS name that must be used when configuring which IP/DNS the client should connect to when trying to establish the tunnel. If we, for instance, type in the IP address directly in the client, it will not work!
Make sure that all these Key usage options are selected. These determine what the intended use is for this Certificate.

Export the certificate as a PEM (.crt) file.
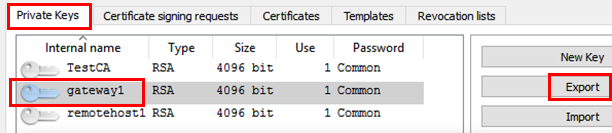
Export this certificate’s private key also as a “PEM private” (.pem) file.
Creating the Remote User (client) Certificate
First, note the following:
- For Windows & MAC clients this step is not needed, only the root certificate needs to be imported to the Windows client machines.
- If the MAC client is configured manually, the Local/Remote ID setting on the client must be configured.
The client Certificate is the certificate that is installed on, e.g. a Windows machine, that attempts to connect to the firewall. The process is very similar to the Gateway Certificate.
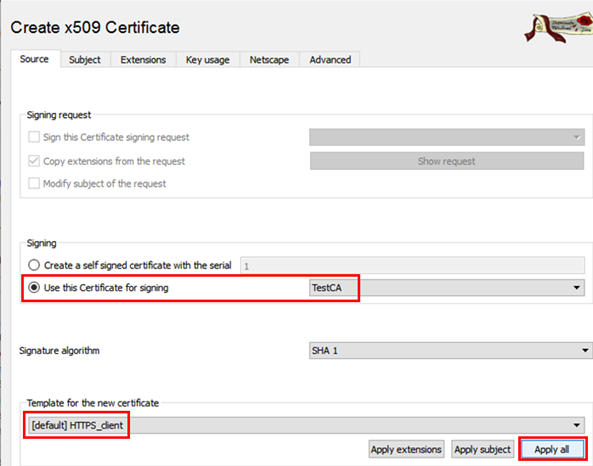
Select the “HTTPS_client” template and press “Apply all”. Make sure to sign it using the “TestCA” certificate.
Enter Distinguished name information and create a 4096 bit RSA key.
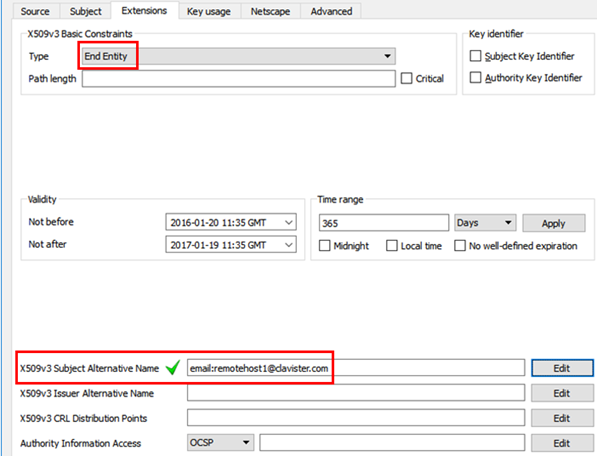
Change Type to be End Entity (as it is not part of a Certificate chain), input an X509v3 Subject Alternative Name.
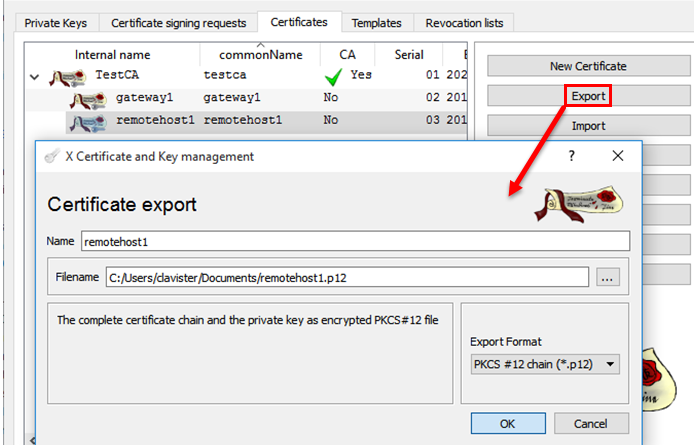
Export the certificate as a PKCS #12 chain (.p12). Both the Client Certificate and it’s private key will be exported in this step, so there is no need to export the private key separately as was done with the gateway certificate/key.
Configuring IKEv2 in Clavister cOS Core
The first step we need to perform before we add the IKEv2 tunnel interface itself is to import the CA servers (XCA) Root Certificate along with the Gateway Certificate plus its private key. All screenshots are based on the WebUI of cOS Core version 11.01.00.
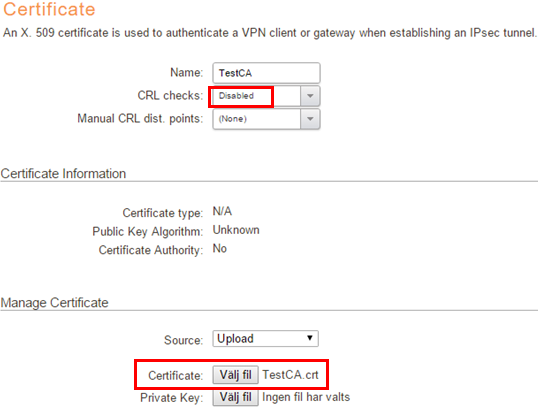
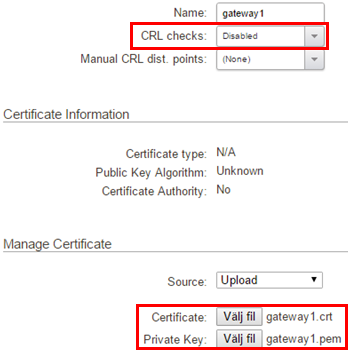
Go to Objects->Key Ring and Add->Certificate. Select the “TestCA.crf” file we exported from XCA earlier. Make sure that CRL (Certificate Revocation List) is disabled since we do not have any connection towards the XCA program for CRL checks. If using a Microsoft CA server, this will most likely be something we want to enable as it can be very handy to be able to revoke a Certificate from the CA server itself.
Repeat the process for the Gateway Certificate along with it’s private key.
Private and Public keys : More information about the public and private keys can be found on the following webpage: https://www.comodo.com/resources/small- … cates2.php
Creating IKE config mode IP pool object
Next, we need to configure an IKE Config Mode IP pool. This object will contain the IP addresses that the firewall will hand out to the connecting clients. Config Mode pool objects are added under Objects->VPN Objects->IKE Config Mode Pool. It is possible to use a predefined or static IP pool. We will use Static IP pool in this example.
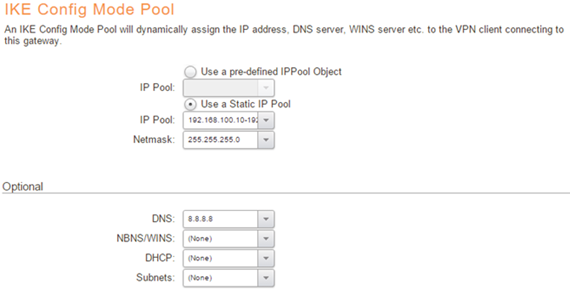
Note about the subnets option: Even though there is an option to specify a subnet on the Config Mode pool, this sub-network option can only be pushed out to clients that support this Config Mode option. Unfortunately Microsoft Windows does not support this option so it is not possible to use split-tunneling when using Windows as a client. It is, however, still possible to achieve “Partial split tunnelling”, similar to what is described in the following knowledge base article: https://kb.clavister.com/324735827/ikev2-partial-split-tunneling-with-windows-and-local-user-database-simplified-
Creating IKE and IPsec proposal list
We now need to create new proposal lists for IKE and IPsec. This is done in the WebUI under Objects->VPN Objects. We need to create one object each for “IKE Algorithms” and “IPSec Algorithms”. Select AES for Encryption and SHA1 as the Integrity algorithm.

Repeat the procedure for the IPsec algorithm, also using AES and SHA1.
Note: SHA1 is no longer considered secure. If a Windows update or manually changing to use a stronger algorithm is possible, it is recommended to do so.
Creating and configuring the IKEv2 interface
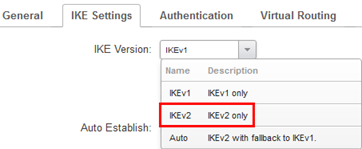
Now we come to configuring the IKEv2 interface itself in cOS Core. This is done under Network->Interfaces and VPN->VPN and tunnels->IPsec. Add a new IPsec interface. Since we are going to use IKEv2, the first thing we need is to change the IKE version. Go to the IKE Settings tab and change IKE version from the default to IKEv2.
Note: In newer cOS Core versions (13.00 and up) IKEv2 is the new default.
Moving back to the general tab, we change local and remote network to be all-nets. The remote network can most likely be restricted based on what kind of client is used. Windows, however, by default sends all-nets as both local and remote network.
The Remote endpoint is all-nets as we do not know where the client(s) are connecting from. We select the IKE Config Mode pool object we created earlier and do the same with the IKE and IPSec proposal lists.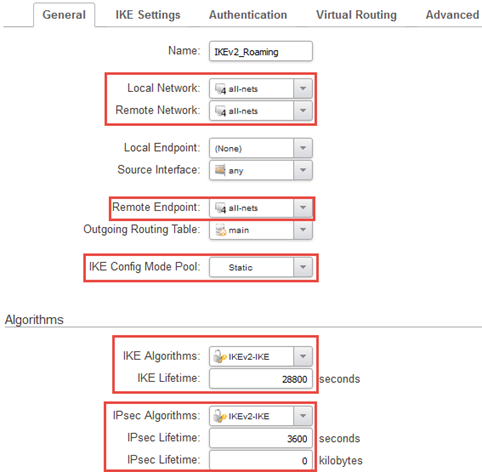
On the IKE Settings tab, regarding settings for IKE DH group and PFS DH group, we leave all settings at their defaults (except the IKE version, which we changed earlier).
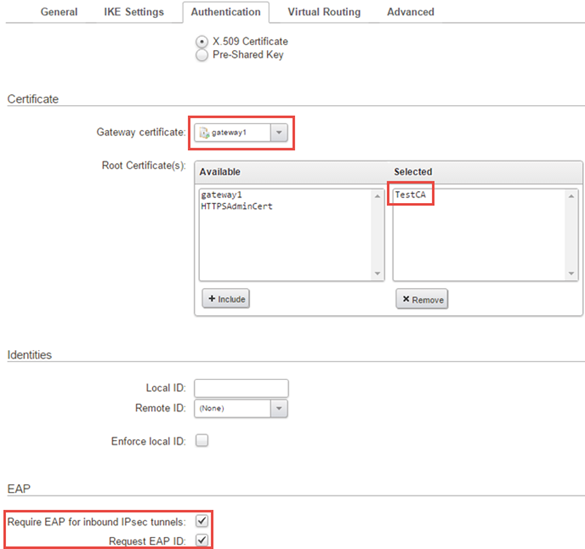
We now come to the Authentication tab. Here we select the Gateway Certificate and also add the TestCA Certificate as Root Certificates using the certificates we imported earlier.
Tip: Make sure that when importing the certificates that they get are tagged as the correct type. A certificate that has a private key becomes tagged as local and a certificate without a private key (such as the CA root certificate) becomes tagged as Remote. Only a Local type certificate can be chosen as the gateway certificate.
IKEv2 tunnels also requires the use of EAP, simply enable the two checkbox for EAP as shown in the below screenshot.
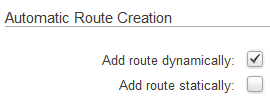
Lastly we need to go to the Advanced tab and uncheck the checkbox for “Add route Statically” and enable the “Add route Dynamically” option. This is very important! If the static route option is enabled it could cause a routing conflict with the external internet access route causing internet access disruptions when deploying the configuration!
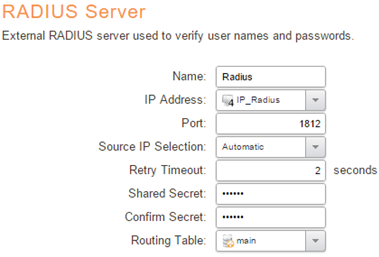
Adding the RADIUS server object in cOS Core
As we will be authenticating our users towards a RADIUS server we need to create a RADIUS Server object which we later can use in our User Authentication Rules. To create the RADIUS server object we go to Policies->User Authentication->User Directories->Radius and add a new RADIUS Server object.
We now come to the User Authentication rule. This is configured under Policies->User Authentication->Rules->Authentication Rules. Create a new rule with the properties shown in the screenshot below. The interface used is the IPsec interface we created earlier.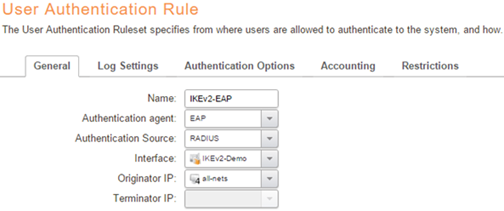
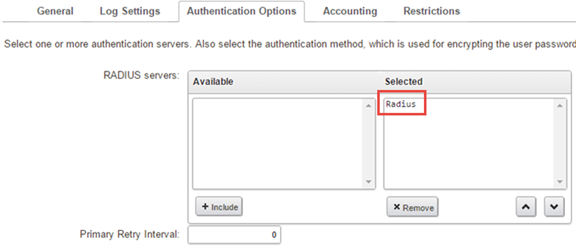
And finally, select the Radius server we defined earlier.
The only thing left to do in cOS Core is to create one or more IP rule set entries to determine what the IKEv2 users should be allowed to access. Since this is very scenario specific, we will not go into detail about those IP rule set entries here.
Installing FreeRADIUS on Ubuntu
This is a short guide on how to install FreeRADIUS on Ubuntu. The exact steps may vary depending on version and potential changes that may occur in the future. The prompt # means that it is a CLI command.
1 Install freeradius:
# apt-get install freeradius
2 Edit EAP method:
# nano /etc/freeradius/eap.conf:
default_eap_type = peap
3 Adding new users:
# vi /etc/freeradius/users
tuxuser Cleartext-Password := "P@sswd4Tux"
tuxadmin Cleartext-Password := "P@sswrd4Admin"
4 Enabling and configuring mschap-v2 protocol:
# vi /etc/freeradius/modules/mschap
use_mppe = yes
require_encryption = yes
require_strong = yes
with_ntdomain_hack = yes
5 Reloading new libraries:
# ldconfig
6 Add new radius clients (Access point):
# vi /etc/freeradius/clients.conf
client 192.168.1.1/24 {
secret = abc123!
shortname = Clavister-IKEv2-Demo
}
7 Restarting service and testing radius authentication:
# service freeradius restart
# radtest tuxuser P@sswd4Tux 192.168.1.10 1812 0peN2d0!
Importing the Certificates & Configuring the IKEv2 tunnel in Windows 10
Import a CA certificate for the Computer account by Microsoft Management Console (MMC).
1. Move the cursor to the right corner of your screen and click Search the Web and Windows.
2. Open Microsoft Management Console(MMC) by entering “mmc” into the search box.
3. On the File menu, point to Add/Remove Snap-in, and open the Add or Remove Snap-ins dialogue.
4. Click the certificates under Available snap-ins and push Add.
5. Select the Computer account and push Next.
6. Select the Local computer and push Finish.
7. Push OK on Add or Remove Snap-ins dialogue and close it.
8. Click the folder Certificates(Local Computer) / Personal / Certificates folder, click the Action-menu, point to All Tasks, and then click Import.
9. Click Next and follow the instructions.
- An imported PKCS#12 file: remotehost1.p12
10. If a CA’s certificate (TestCA) is extracted into Certificates(Local Computer) / Personal / Certificates folder, move it to Certificates(Local Computer) / Trusted Root Certification Authorities / Certificates folder by dragging and dropping the certificate’s icon.
Setting up the VPN connection
Setting up a VPN connection.
1. Move the cursor to the right corner of your screen and click Search the Web and Windows.
2. Open Network and sharing center by entering Network and sharing center into the search box and then click Set up a new connection or network.
3. Click Connect to a workplace and push Next.
4. If you are asked “Do you want to use a connection that you already have?”, select “No, create a new connection” and then push Next.
5. Click Use my Internet connection (VPN).
6. Click I’ll set up an Internet connection later..
7. Enter gateway1.clavister.com (Clavister IKEv2 Server hostname) into Internet Address and Example VPN into Destination name and push Create.
8. Open Network and sharing center again and click Change adapter settings.
9. Open the properties dialogue of Example VPN adapter and show Security tab.
10. Enter the following:
- Type of VPN: IKEv2
- Data encryption: Require encryption (disconnect if server declines)
- Authentication: Use Extensible Authentication Protocol(EAP) and EAP-MSCHAPv2
11. Push OK.
Edit the hosts file if DNS service is not available for gateway1.clavister.com
1 Open “C:Windows/System32/drivers/etc/hosts” by notepad as an administrator. If you can’t find these folders, please see Show hidden files.
2 Add the following line into this hosts file.
10.0.0.1 gateway1.clavister.com # (Example VPN)
3 Save and close the file.
The importance of DNS
Make sure that the DNS or IP address you are attempting to connect to using the client is what is defined in the gateway certificate. If you, for instance, type in IP 1.2.3.4 instead of what is defined in the certificate (in our example gateway1.clavister.com) the connection attempt will fail.
Related articles
11 Jan, 2023 ipsec core vpn
24 Mar, 2023 core ipsec ippool dhcp
12 Apr, 2023 core proxyarp arp ipsec routing
18 Mar, 2024 core certificate oneconnect ipsec vpn
2 Jul, 2026 vpn core ipsec alg highavailability trafficshaping
2 Feb, 2021 core sslvpn macos certificate
23 Nov, 2022 core ipsec
21 Feb, 2023 ipsec certificate windows ca core
22 Mar, 2021 core ipsec routing
18 Mar, 2024 core incontrol certificate oneconnect ipsec vpn
11 Dec, 2025 core routing ospf ipsec
17 Jun, 2021 core ipsec routing
8 Mar, 2023 core l2tp ipsec
18 Mar, 2024 onetouch sslvpn oneconnect troubleshoot certificate
20 Feb, 2023 core vpn ipsec
4 Aug, 2023 core ipsec troubleshoot ike
14 Apr, 2021 core license ipsec
8 Sep, 2020 core ipsec rules access
23 Jan, 2024 core howto certificate management letsencrypt
29 Mar, 2023 ipsec core windows vpn l2tp
5 Apr, 2023 ipsec core
16 Sep, 2020 vpn ipsec ikev2 windows howto dh
7 Dec, 2022 ipsec ike troubleshoot core
14 Dec, 2022 core ipsec
5 Apr, 2023 core nps ipsec radius legacy
14 Mar, 2023 core ipsec vpn ikev2 certificate
23 Aug, 2022 core ipsec license memory
11 May, 2023 oneconnect certificate howto
15 Mar, 2023 core ipsec ipv6
22 May, 2024 netwall ikev2 windows certificate vpn core
23 Aug, 2022 core connections ipsec memory
13 Feb, 2023 ipsec core routing failover
28 Mar, 2023 dhcp ipsec core