Using all-nets / 0.0.0.0/0 as the source or destination network
The base scenario
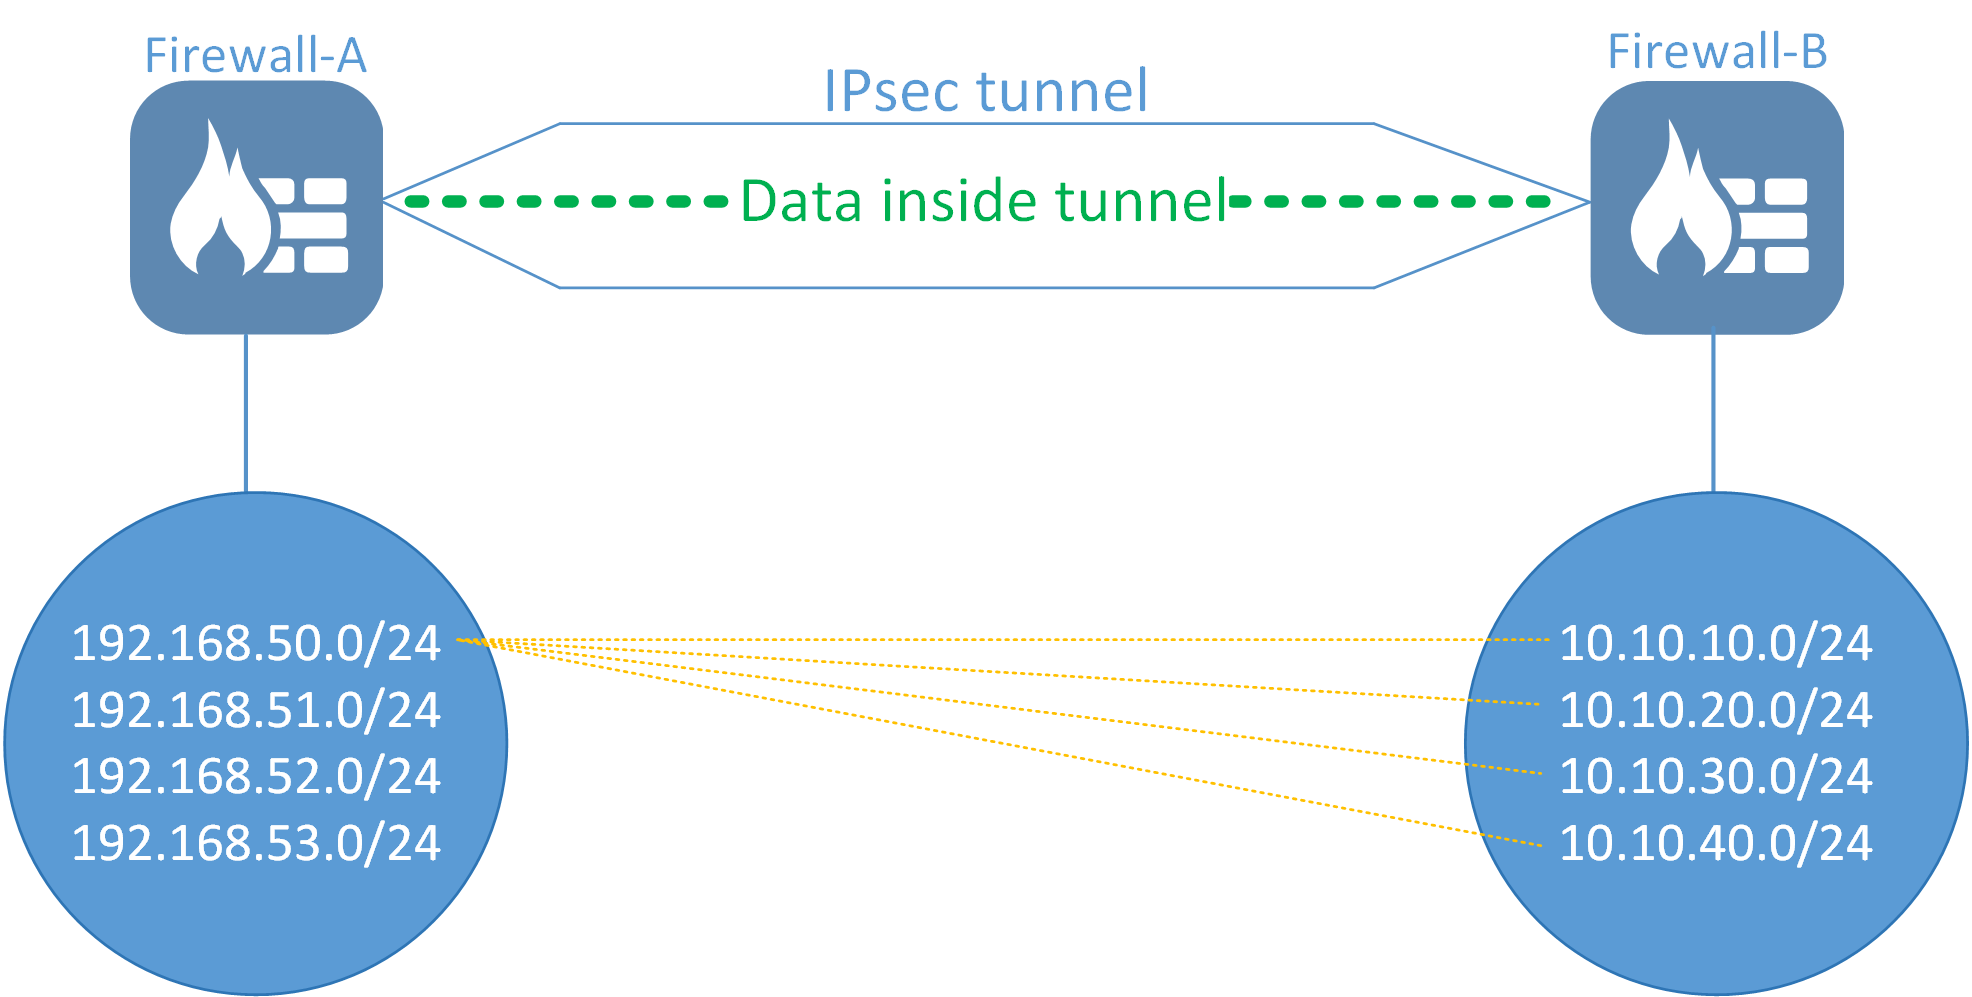
Let us first look at a basic IPsec scenario. A Lan2Lan IPsec tunnel between two firewalls and a client and server who want to communicate.

This scenario is fairly straight-forward, the IPsec tunnel configuration for the Local and Remote network would look something like this:
Firewall-A
Local Network = 192.168.50.0/24
Remote Network = 10.10.10.0/24
Firewall-B
Local Network = 10.10.10.0/24
Remote Network = 192.168.50.0/24
For this scenario we only need one Route on each side and two IP policies if we want to allow connections to be initiated by either side. The route and IP rule set entries needed on Firewall-A it would look something like this:
Route IPsec_To_Firewall-B 10.10.10.0/24
Allow Lan Lannet IPsec_To_Firewall-B 10.10.10.0/24 Service=YourService
Allow IPsec_To_Firewall-B 10.10.10.0/24 Lan Lannet Service=YourService
Next, we set up the equivalent route and rules on Firewall-B. The verifications needed to make sure the correct traffic/networks are allowed to communicate are:
- Verify that the the network/IP's that want to communicate between A to B or from B to A is part of the local and remote network.
- Verify that traffic is correctly routed on the IPsec tunnel interfaces for the defined remote network.
- Verify that the IP policies allow the communication to/from the tunnel according to the requirements set out by the administrator.
Multiple networks on both sides
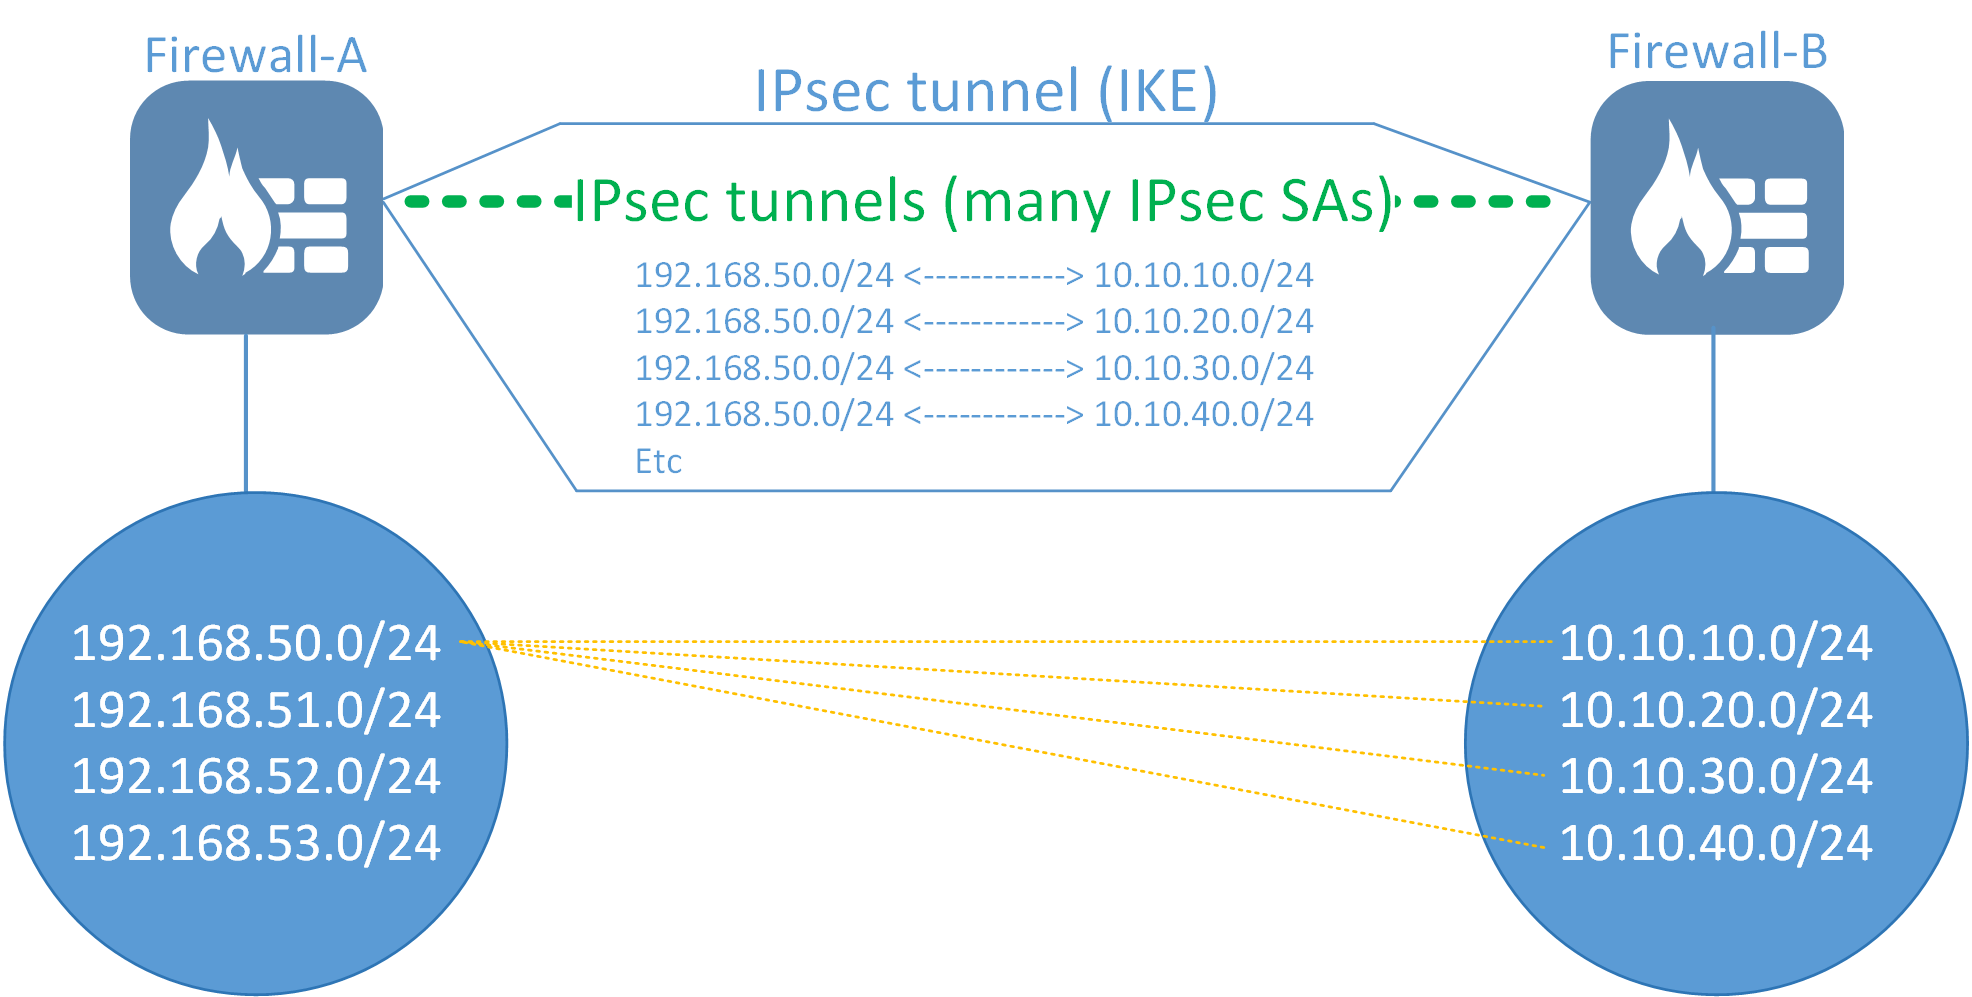
Lets say we expand the above scenario, we now have one IPsec tunnel but 4 networks behind each Firewall.

The above will mean that, depending on which networks that want to communicate, we may end up with a total of 16 IPsec tunnel negotiations (17 if we also count IKE). One for each possible network combination (4x4). In the example above, the network 192.168.50.0/24 wants to talk to all 10.10.xx.xx networks. This alone would generate 4 IPsec SA (Security Association) tunnel negotiations, one for each network combination.
The network configuration on each firewall will then look like this:
Firewall-A
Local Network = 192.168.50.0/24, 192.168.51.0/24, 192.168.52.0/24, 192.168.53.0/24
Remote Network = 10.10.10.0/24, 10.10.20.0/24, 10.10.30.0/24, 10.10.40.0/24
Firewall-B
Local Network = 10.10.10.0/24, 10.10.20.0/24, 10.10.30.0/24, 10.10.40.0/24
Remote Network = 192.168.50.0/24, 192.168.51.0/24, 192.168.52.0/24, 192.168.53.0/24
This means that each network combination will need to negotiate their own IPsec SA in order for all network combinations to work.

When to use all-nets as the local and/or remote network
IPsec is complex. There will always be some, less obvious scenario that works badly due to the countless factors involved in IPsec tunnel creation and the data transfers between the two tunnel endpoints. Potential problems could include timing, latency, PPS, BPS, packet losses, vendor differences, compatibility, bugs, load balancing, scanning systems, anti-virus, man-in-the-middle attacks and the list goes on. A way to try limit the chance or even solve a problem when a tunnel works badly is to limit the amount of negotiations done between the tunnel endpoints. The less negotiations, the less chance of a timing related issue. Tunnel re-keying can, in many cases, be the cause of problems when Endpoint-A deletes the old SA but Endpoint-B does not or vice-versa. Then, either side believes the tunnel is up when it is not and this could cause network interruptions which could be difficult to narrow down. Under optimal conditions this should never happen, but when most tunnels are going over the Internet, it’s hard to predict what could interrupt traffic.
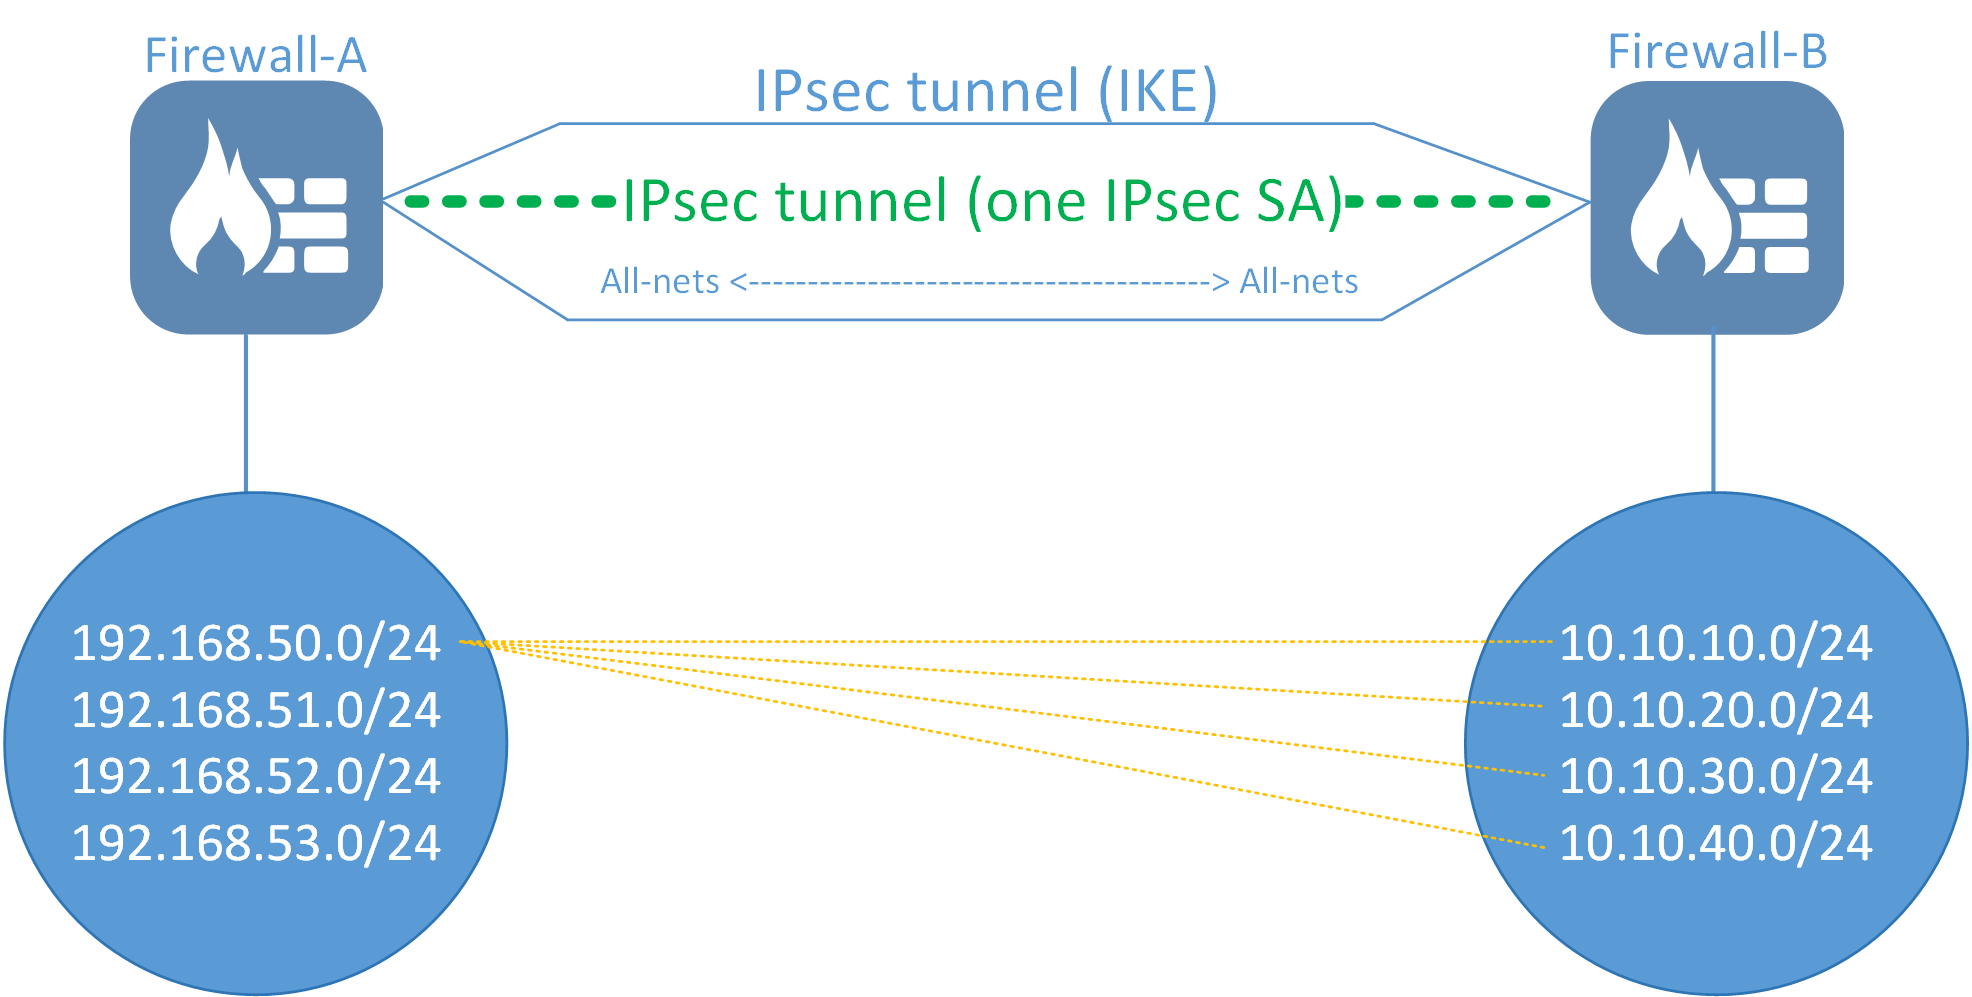
A way to limit the amount of negotiations and re-keys would be to have all networks go over a single IPsec SA negotiation instead of multiple. This is achieved by configuring the side with multiple networks to use “all-nets” (0.0.0.0/0) as it’s local and/or remote network. Since all-nets consists of all available networks there would be no need to negotiate more than one IPsec SA.

A general principle for when all-nets should be used
A general principle that can be followed is that if you have more than 3 networks in either the local or remote network on an IPsec tunnel, use all-nets instead. If one side only has one network then there is no point in using all-nets for both the Local and Remote network tunnel definition unless there are plans to extend the tunnel with more networks in the future. Then it might be an idea to use all-nets anyway (see pros and cons below).
Pros and cons
Pros:
- Only one IKE and IPsec SA needs to be negotiated.
- Adding or removing networks allowed to/from the IPsec interface is simply a matter of modifying the rules and routing. No change to the tunnel itself is needed.
- A Tunnel Monitor can be used to restart the entire tunnel.
- If multiple networks are used, the tunnel monitor can only trigger and tear down one IPsec SA (basically one network combination).
- Only one IPsec SA re-key is needed. High DH groups can cause "hiccups" depending on the CPU power of the system. So instead of, for example, 16 re-keys every 3600 seconds, we have only one.
Cons:
- Need to be aware of the two pitfalls when configuring all-nets (see below)
- Any new network is allowed to/from the IPsec tunnel. If any routing or IP rule set mistakes are made, there will be no "allowed networks" check done on the IPsec tunnel itself. The verification check-list mentioned previously would then look like this:
Verify that the the network/IP's that want to communicate between A to B or from B are A is part of the local and remote network.- And to clarify the above point, this means that this check is basically not performed as all networks are allowed inside the IPsec tunnel.
- Verify that traffic is correctly routed on the IPsec tunnel interfaces for the defined remote network.
- Verify that the IP policy's allow the communication to/from the tunnel according the requirements set out by the administrator.
- Less IPsec SA re-keys. Since there is only one SA negotiated the security would be considered less as an attacker would then only need to break the encryption of one IPsec SA if they want to access all network segments.
- A way to mitigate this slightly would be to set a lower lifetime on the IPsec SA (the default is 1 hour / 3600 seconds) in order to make it re-key more often.
The two pitfalls (Static route and source IP)
Using all-nets as either local or remote network has two pitfalls that the administrator must be aware of as it could, in the worst case, cause Internet access to be lost after configuration deployment.
Using all-nets as local network
The item to be aware of here is the source IP the firewall itself will use when sending traffic into the tunnel. Normally when a local network is defined the firewall can use a local IP that matches an interface that the local network belongs to. But when using all-nets the firewall will be unable to determine which source IP it should use as sender.
A few examples of when the Firewall would need this IP:
- When sending a ping into the tunnel from the firewall itself using the CLI (e.g. "Ping 10.10.10.50 -verbose"). The IP sender would then be 127.0.0.1 and that would not work that well.
- When sending logs generated from the firewall itself towards a log receiver located behind an IPsec tunnel. The IP sender would then again be 127.0.0.1.
- When NAT'ing traffic into the IPsec interface and the default "use interface address" option is used on the allowing IP Policy. Then the IP sender would again be 127.0.0.1.
- When activating a Tunnel Monitor, the source IP of the monitor would be 127.0.0.1 and that would never generate a reply from the target monitoring host.
The solution to the problem would be to manually configure an IP address on the IPsec tunnel, as shown below.

Using all-nets as the Remote Network
This one is the most “dangerous” usages sinces it could, in the worst case, cause your Internet access to be disrupted. The reason for this is due to the default option that automatically adds a route in the designated routing table towards the remote network. And if the Remote Network is set as “all-nets”, it would add an all-nets route pointing to the IPsec interface.
In the worst case, your routing table might look like this:
Type    Interface    Network   Gateway Metric
Route   Wan          all-nets  ISP_GW  100
Route   IPsec_Tunnel all-nets          90
And since the IPsec tunnel has a lower routing metric than the interface route, it would cause all Internet traffic to be sent into the IPsec tunnel itself. However, there are scenarios where this could be the desired outcome.

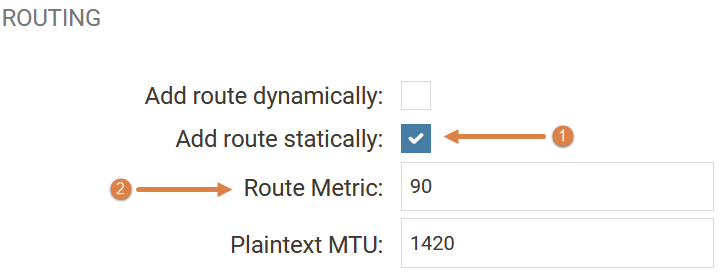
The solution to this problem is to either remove the checkbox for the auto-route creation (1) or to increase the metric (2) to be higher than the normal interface route. It is strongly recommended to remove the static route and manually configure the networks/routes that should be used to/from the IPsec tunnel. An administrator most likely would want to only route a few select networks into the IPsec tunnel anyway.
Using Auto-Establish and a Tunnel Monitor
A Tunnel Monitor has a limitation that it can only monitor one IP address. This means that only one network needs to be considered as down for the the tunnel to be reestablished. The advantage of using a Tunnel Monitor on an all-nets tunnel is that the all-nets SA is then restarted which effectively means the entire IPsec interface is too. This means that a Tunnel Monitor works much better when using all-nets as the network.
Auto-Establish, however, is a feature whose purpose is to try keep all IPsec network combinations up at all times. The problem is that it is frequently active (once every second) and could, in many situations, generate more problems than it solves. If we consider the example above without using all-nets, it would mean that Auto-Establish would try to keep all 16 network combinations up all the time and if one or more is failing (for example, due to a configuration fault on the remote endpoint) it would bombard the remote endpoint every second with a negotiation that constantly fails. It is therefore recommended to turn off this option on ALL IPsec tunnels whenever possible.
Related articles
11 Jan, 2023 ipsec core vpn
24 Mar, 2023 core ipsec ippool dhcp
21 Oct, 2022 core arp routing
12 Apr, 2023 core proxyarp arp ipsec routing
28 Mar, 2023 ikev2 windows vpn routing splittunneling
18 Mar, 2024 core certificate oneconnect ipsec vpn
23 Nov, 2022 core ipsec
21 Feb, 2023 ipsec certificate windows ca core
22 Mar, 2021 core ipsec routing
18 Mar, 2024 core incontrol certificate oneconnect ipsec vpn
11 Dec, 2025 core routing ospf ipsec
30 Nov, 2022 core routing
1 Jun, 2022 core routing management
8 Mar, 2023 core l2tp ipsec
20 Feb, 2023 core vpn ipsec
25 Nov, 2022 core routing bgp
4 Aug, 2023 core ipsec troubleshoot ike
14 Apr, 2021 core license ipsec
8 Sep, 2020 core ipsec rules access
29 Mar, 2023 ipsec core windows vpn l2tp
25 Sep, 2025 core routing pbr
5 Apr, 2023 ipsec core
16 Sep, 2020 vpn ipsec ikev2 windows howto dh
7 Dec, 2022 ipsec ike troubleshoot core
14 Dec, 2022 core ipsec
16 Oct, 2023 howto core pbr routing netwall isp
5 Apr, 2023 core nps ipsec radius legacy
15 Dec, 2022 core routing ospf
14 Mar, 2023 core ipsec vpn ikev2 certificate
12 Jan, 2026 core howto routing redundancy
23 Aug, 2022 core ipsec license memory
7 Nov, 2022 core arp log routing
15 Mar, 2023 core ipsec ipv6
6 Apr, 2023 core ripv2 routing
17 Mar, 2023 core routing rules ping icmp cli
23 Aug, 2022 core connections ipsec memory
27 Jan, 2021 core stateless routing brokenlink
13 Feb, 2023 ipsec core routing failover
18 Apr, 2023 core routing transparentmode proxyarp
28 Mar, 2023 dhcp ipsec core