Introduction
By default, SSH access requires a username and password to be entered. An alternative is to authenticate automatically by using SSH keys . This method of authentication is useful when using scripts. It is sometimes referred to as public key authentication .
Authentication in this way requires that the public key file of a public/private key pair is uploaded to cOS Core and associated with the relevant User object. Both the public and private key files are installed in the connecting SSH client.
Here, we will use PuTTY as the SSH client and also use the PuTTY Key Generator to create the public/private keys.
Getting started
In this example we will be using PuTTY as the client to connect to cOS Core and PuTTYgen (PuTTY Key Generator) to generate the needed keys. Both these programs with relevant documentation can be downloaded from this link:
https://www.chiark.greenend.org.uk/~sgtatham/putty/latest.html
This guide assumes that a cOS Core firewall is configured with a least a base configuration where access to SSH management is already working using username & password.
Generating the keys
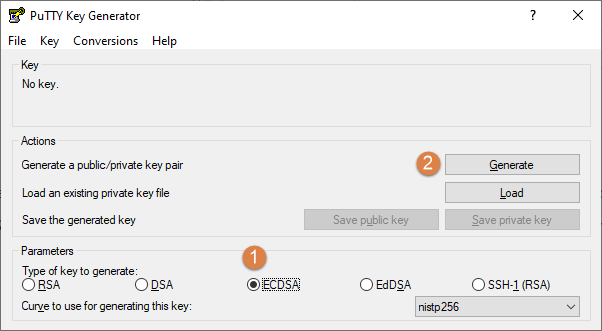
To start, we need to generate the required public and private keys. To do that we start PuTTYgen and generate an ECDSA (1 & 2) type key. RSA is selected by default but that algorithm is now considered to be legacy/old and should not be used. cOS Core will, by default, reject a key using this method so it cannot be used unless you change the accepted ciphers in cOS Core (this is not recommended).
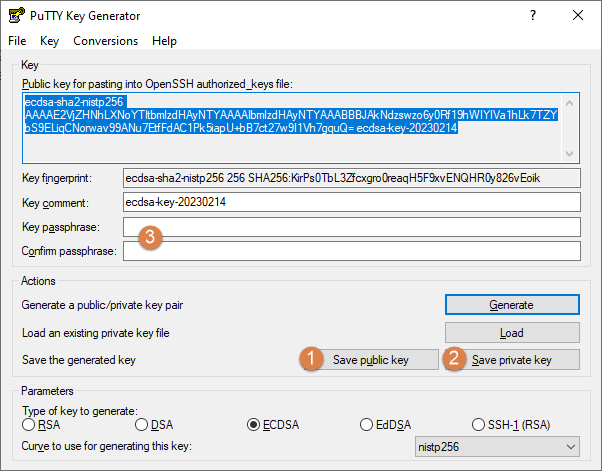
Once the key is generated we save the public key (1) and the private key (2). Setting a Key Passphrase is optional (3). By setting a password here it means that when connecting, the password for the key needs to be typed in which defeats the aim of using public keys to connect instead of using a password. It will be up to the administrator to decide what to do here. In this example we set a password. The private key is considered secret so it should never be duplicated outside the device it is used on (unless the same public and private key is intentionally used on other devices to connect to cOS Core). Note that if there are multiple administrators who want management access via SSH, each could be assigned different keys.
Importing and using the public key in cOS Core
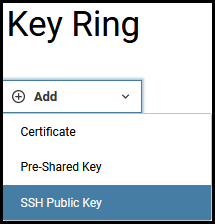
The next step is to import the newly created public key in cOS Core. To do that we go to Objects→Key Ring and add a new public key.
Next step is to give the imported key a name and since we are adding a new key, the option to “Continue using current public key data” is greyed out.
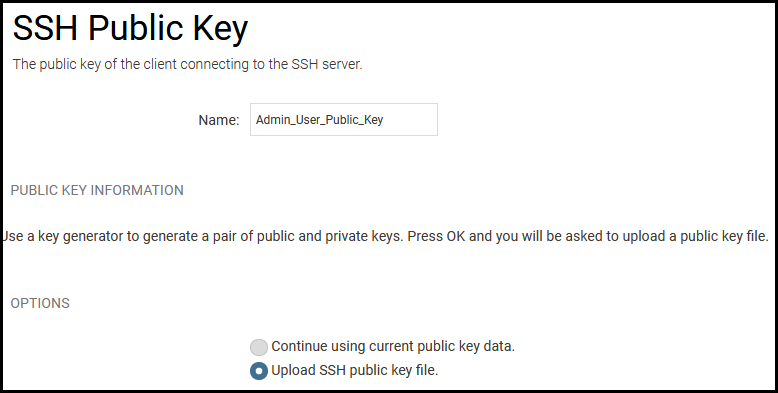
Select the public key we created earlier using PuTTY Key Generator (not the private key as that would generate an error).
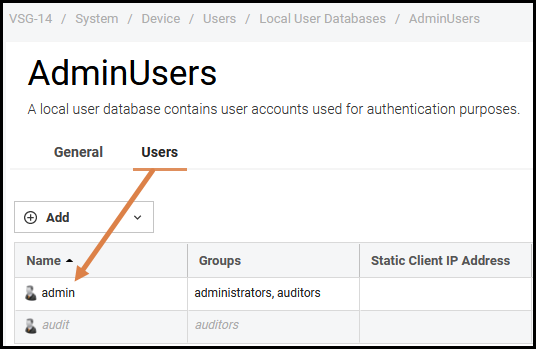
Next step is to assign this newly imported key to a user. In this example we will use the default “AdminUsers” database and the “Admin” user as the recipient but it can be whatever user the administrator has created based on needs and requirements.
To do this we go to System→Local User Database→AdminUsers and open the “Admin” user.
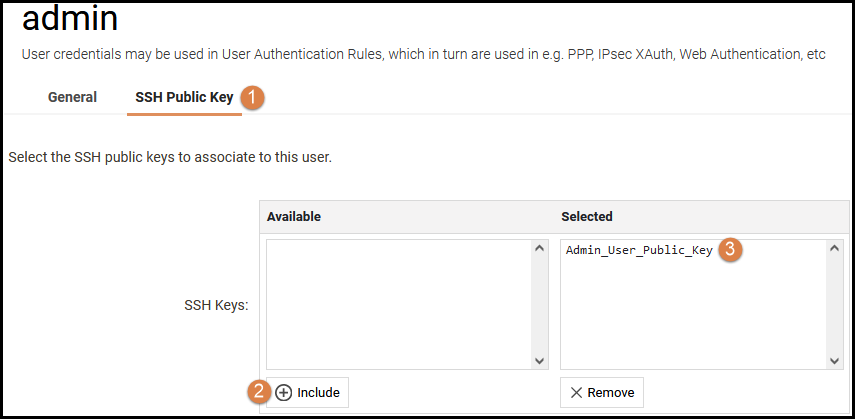
Then we go to the SSH Public Key section (1), as shown below, and include (2) the newly imported public key as the selected SSH key (3).
And the last step needed in cOS Core is to make sure that the option to use Public Keys is selected (1) on the remote management rule for SSH. This is done under System→Remote Management→(YourSSHRule).
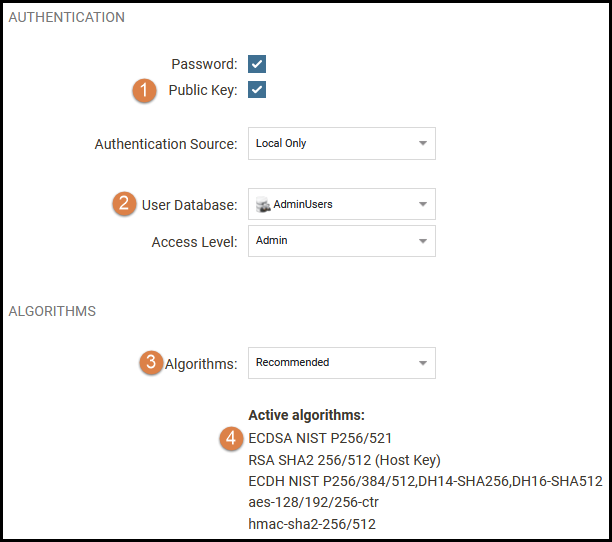
We also make sure that the User Database (2) is used since this database contains the Admin user which has been assigned the public SSH key. The Algorithms (3) can be changed, if required, but for now there is no reason to change from the recommended setting as the algorithm we chose earlier in PuTTY Key Generator (ECDSA) is part of the active algorithms list (4).
All done, we can now save & activate the cOS Core configuration and move over to the client side, PuTTY.
Configuring the PuTTY client
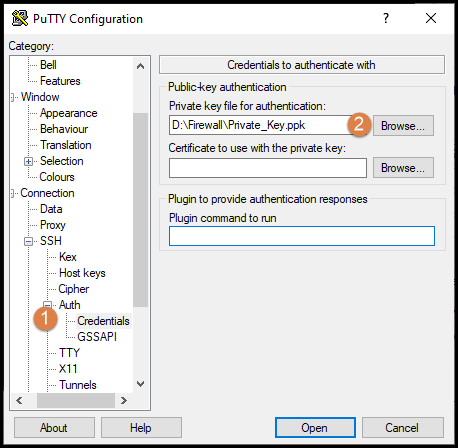
In order to connect with PuTTY to the firewall we need to load the private key generated earlier using PuTTY Key Generator as shown in the below picture.
Once that is done we can now save our session in the PuTTY configuration. Input the IP/hostname of the firewall (1), give the session a name (2) and then save it (3). It then becomes easier to connect next time and the path to the private key is saved (4).

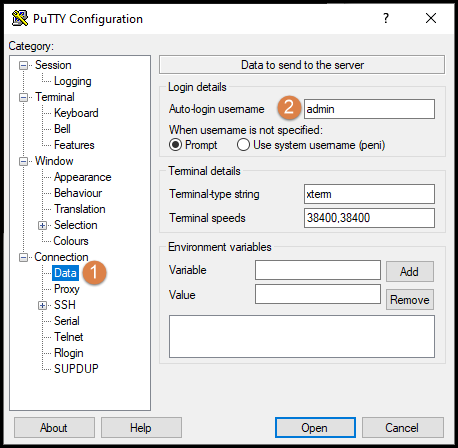
An optional setting would is under the Connection→Data section (1) shown below. Complete the Auto-Login username (2) option in order to avoid having to type in the username when connecting. Remember to update the session setting above to reflect the change.
Once that is done, we can now connect to the firewall using the private and public keys that we have created and are being used in the firewall and client.
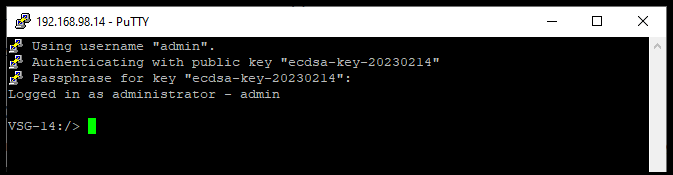
The passphrase for the key we created earlier must still be typed in but if this step want to be skipped a new key-pair needs to be created (or re-saved) where no password is set on the private key.
Q & A
Can InControl be used to generate the keys?
Yes, InControl can be used to generate the keys. InControl saves the public + private key in the .PEM format. If we want to use PuTTY, we need to first load the .PEM file into the PuTTY Key Generator and then save the private key in PuTTY’s .PPK format.
Why can’t I export the private key when I generate the keys from from InControl?
Both the public and private keys are saved in one file using the .PEM format. If other formats are needed there are many programs that can convert a certificate from one format to another (see above for an example). A good free program that can be used to convert certificates between various formats is called XCA (from Sourceforge.net).
Does cOS Core not require a private key as well?
No, only the client that initiates the connection and sends data needs a private key. SSH public key authentication relies on asymmetric cryptographic algorithms that generate a pair of separate keys (a key pair), one “private” and the other “public”. We keep the private key a secret and store it on the computer used to connect to the remote system.
I’m getting the error “PuTTY key format too new”, what does this mean?
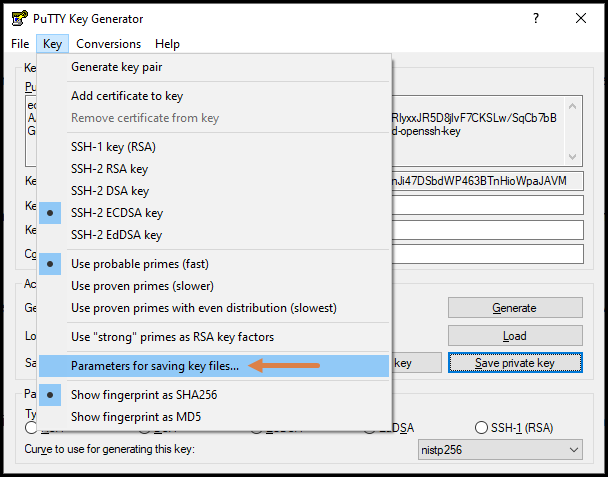
It means that the private key was saved in a newer format than what the PuTTY client being used can support. The solution is to download the latest version of PuTTY or save the private key in an older format. We can do this in the PuTTY Key Generator by selecting the “Parameters for saving key files…” option in the “Key” menu (see the image below).
Related articles
No related articles found.