Brief information on certificates and why they matter for the OneConnect server and client
Certification validation in the OneConnect client is done in several steps.
- First, Client initiates a connection to the configured NetWall as an example vpnserver.mydomain.com
- Next, the NetWall presents its system certificate (end-entity). The subject field needs to contain the correct DNS name(s) (FQDN), either vpnserver.mydomain.com (or *.mydomain.com when using a wildcard certificate)
- If there is a mismatch (for example you enter the IP address instead of the FQDN, or the certificate is not trusted) you get an error message.
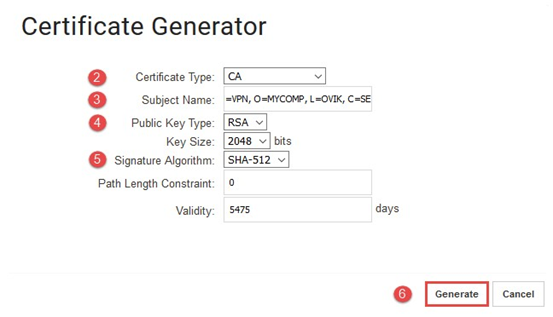
How to generate CA certificate using NetWall WebUI (root)
To generate the CA certificate from cOS Core WebUI, go to “Objects -> Key Ring -> Add -> Certificate -> Generate Certificate -> Configure”:
- To configure the CA certificate.
- Warning: Generating certificates is very CPU intensive, generating the certificates below causes a smaller desktop appliance to potentially stall for several seconds.
- Warning: Generating certificates is very CPU intensive, generating the certificates below causes a smaller desktop appliance to potentially stall for several seconds.
- Input the certificate type as CA certificate.
- Replace the subject name with something suitable for the organization.
- CN= common name, OU=organizational unit, O=company name, L=province, C=country
- Choose the public key type, in this example we will be using RSA with key size of 2048 bits.
- Choose the suitable signature algorithm for configuration, in this example we will be using SHA-512.
- Generate the CA certificate.
- Disable CRL checks as we cannot act as a CRL repository.
- CRL = Certificate-Revocation-List.
- CRL = Certificate-Revocation-List.
- Please Download and save the certificate for later, this needs to be installed in the correct Windows clients certificate store later.
- Important: Only export the certificate, not the key. The key is secret and should never leave the firewall as it can be used to generate additional certificates using this as the base.
- This would then be referred to as the "root" certificate.
How to generate CA signed certificate using NetWall WebUI (end-entity)
This certificate will be the one used in the firewall’s remote management section and will be the information the firewall presents to the client when it connects.
To generate the CA signed gateway certificate, go to “Objects -> Key Ring -> Add -> Certificate -> Generate Certificate -> Configure”:
- Configure the certificate object in the cOS Core key-ring.
- Select the certificate type as End-Entity certificate.
- Replace subject name with something suitable for the organization.
- Important: Please note that the Subject Alternative Name needs to resolve to the public IP where the OneConnect Server is located (the firewall).
- The option to enable "IKE Authentication" is optional, if the certificate should also be used on an IPsec tunnel in one way or the other it can be useful to have this option enabled. But if the certificate is to be used for OneConnect only, it is not needed.
- Generate the gateway certificate

- This certificate is then referred to as "end-entity".
- Disable CRL checks as we cannot act as a CRL repository.
- CRL = Certificate-Revocation-List.
How to apply use your newly generated certificates in the configuration
- Select the certificate as HTTPS certificate under System -> Device -> Device Settings -> Remote Management -> Advanced Settings. And add your created End-entity as as “HTTPS Certificate”

- Note: In this particular scenario the root certificate does not need to be used/added to the root certificate list. But if e.g. certificate chains are used it would be needed.
How to set up the Clavister OneConnect Server in the NetWall WebUI
Regarding user storage
The OneConnect VPN requires that we define a user storage, this can be either a Local User Database, a LDAP, or a Radius Server. How to setup these different options can be found in the admin guide, here we focus on the Local user Database.
The first step is to create a new Local User Database. To accomplish this, we go to System->Device->Local User Databases and create a new database. Once the database is created, we call the database “Roaming_Users” then we can start adding users to the database. The General tab contains the name of the database and a comment field while the second tab, contains the ability to add/remove and edit users in the database.
Server configuration
This step Is described in detail in our Knowledge base:
https://kb.clavister.com/329098813/how-do-i-set-up-a-oneconnect-vpn-tunnel-in-cos-core
A Detailed Step-By-step Guide of this can also be found in the cOS Core Administration Guide. This can be downloaded from MyClavister as a PDF or read online. See chapter: Example 10.27. Setting Up a OneConnect VPN Interface:
https://docs.clavister.com/repo/cos-core-administration-guide/
To create a OneConnect VPN we need to go to Network -> Interface and VPN -> OneConnect and then press the add button and select OneConnect Interface.
Once the interface window opens then you need to fill in information on the tunnel.
- Name: A descriptive name.
- Inner IP: This is the local IPv4 address on the firewall side within the OneConnect tunnel. The Inner IP setting, this IP should be an IP address in the same network segment (but not within) as the IP pool. It can be used by the firewall when e.g. sending a ping to the client assigned IP address or if there is a setup where you want to NAT traffic in the reverse direction towards the client. So in most situations the “Inner IP” would not be actively used but it’s a required field as leaving it blank could potentially cause problems depending on how OneConnect is used and the direction of the traffic flow.
- Outer interface: The interface on which the OneConnect listens for connection attempts (usually the external interface, e.g., Wan).
- Server IP: Which IP address the OneConnect server listens to for incoming connection attempts from clients.
- Host name: This is an optional property. If specified, the hostname used by the client must match the value specified otherwise the firewall will not respond. Can be useful when using wildcard certificates and multiple OneConnnect servers are configured in order to make sure clients connect to the correct server.
- Server Port/DTLS Port: What port type the connection is attempting to use.
- Authentication Source: What kind of authentication is required for the VPN.
- Client IP Address Pool: The IP pool that connecting clients get their IP from. Remember the Inner IP must be part of the same network as the pool but must not be one of the pool's IPs.
- Netmask: Must be set for the IP pool to limit its size. Default setting is 255.255.255.0.
- DNS: What DNS server(s) should be given to connecting clients to use (primary and optionally secondary).
- Client Routes: Default setting is All-routes setting so a connecting client routes all traffic over the VPN.
Once this setting is set-up, we can press OK and save the configuration. We can now configure the OneConnect client version 3 or higher or a 3rd party client such as OpenConnect.
Needed IP Policies
Regarding the required IP policies, it is up to the network administrator to define/decide what traffic that should be allowed into their networks through the VPN tunnel. This is done by defining IP Policies in the IP Rule Set. Please make sure that the relevant Policies are configured to allow the desired traffic to/from the OneConnect clients.
OneConnect Client installation
The following client setups are covered by articles in the knowledge base:
Setting up the Clavister OneConnect client (version 3 or later) for Microsoft Windows is described in: https://kb.clavister.com/336136165
Setting up the Clavister OneConnect client (version 3 or later) for Apple (MacOS, iOS, iPadOS) is described in: https://kb.clavister.com/336136145
Setting up the Clavister OneConnect client (version 3 or later) for Android is described in : https://kb.clavister.com/346366860
Setting up the OpenConnect client for Android is described in: https://kb.clavister.com/329095020
Setting up the OpenConnect-GUI client for MacOS is described in: https://kb.clavister.com/329092217
Setting up the OpenConnect client for Linux is described in: https://kb.clavister.com/329092224
Importing the Certificate to the client
These steps vary depending on the Operating system.
As mentioned earlier, the client also needs to trust the certificate used by the firewall to establish the tunnel. Below steps are only necessary if you are using a Self-Signed certificate.
Windows
Add the Self-Signed ROOT (not end-entity) certificate which downloaded before in to the local client computer using Microsoft managements as following: https://support.securly.com/hc/en-us/articles/360026808753-How-to-manually-install-the-Securly-SSL-certificate-on-Windows
Short description: The Root certificate should be installed in the Computer Account (not user or service account) under Certificates→Trusted Root Certificate Authorities→Certificates.
MAC
It is often enough to browse to the FQDN/IP with Safari and then be prompted to trust the certificate or not.
Related articles
10 Mar, 2023 core vpn ikev2 windows radius certificate
13 Jun, 2022 oneconnect macos ios windows android
3 Jun, 2022 oneconnect openconnect sslvpn
8 Feb, 2026 oneconnect sase cloud
8 Feb, 2026 oneconnect sase
28 Apr, 2023 openconnect oneconnect macos ios iphone
18 Mar, 2024 core certificate oneconnect ipsec vpn
29 Jun, 2026 sase cloud oidc oneconnect core
23 Aug, 2022 sslvpn openconnect oneconnect android core
29 Oct, 2021 sslvpn openconnect oneconnect windows
9 Feb, 2024 core oneconnect windows splittunneling dns
2 Feb, 2021 core sslvpn macos certificate
21 Feb, 2023 ipsec certificate windows ca core
18 Mar, 2024 core incontrol certificate oneconnect ipsec vpn
27 Oct, 2022 oneconnect log
23 Jun, 2026 sslvpn openconnect oneconnect linux core
8 Apr, 2021 core sslvpn oneconnect interfaces arp
4 Jul, 2025 core oneconnect oidc
18 Mar, 2024 onetouch sslvpn oneconnect troubleshoot certificate
25 Feb, 2022 oneconnect windows howto
23 Jan, 2024 core howto certificate management letsencrypt
8 Feb, 2026 sase oneconnect core userauth oidc
19 May, 2026 oneconnect core sase
27 Feb, 2024 oneconnect userbased core
23 Aug, 2022 core oneconnect
28 Nov, 2022 core configuration oneconnect
21 Nov, 2025 oneconnect sase cloud radius
14 Mar, 2023 core ipsec vpn ikev2 certificate
27 Aug, 2024 oneconnect windows
22 May, 2024 netwall ikev2 windows certificate vpn core
8 Jun, 2022 openconnect oneconnect android
23 Aug, 2022 sslvpn openconnect oneconnect macos windows linux core