Summary
Memory dumps of processes can be examined at a later point using some different tools in order to determine what has happened, or why, and can be useful for all sorts of issues, ex. why something has crashed, why an error message has popped up, or why something is leaking memory. This document aims to outline how to take a proper memory dump.
Bitness
We only support 64-bit Windows operating systems, but our processes (ICC.exe, ICS.exe, ILA.exe, LogReceiver.exe etc) may run as either 32-bit processes or as 64-bit processes. There are big differences in all sorts of layers, but for the purpose of this document we don’t care about the differences - we only acknowledge that they are very important.
How to determine the bitness of a running process?
Task Manager on Windows 10
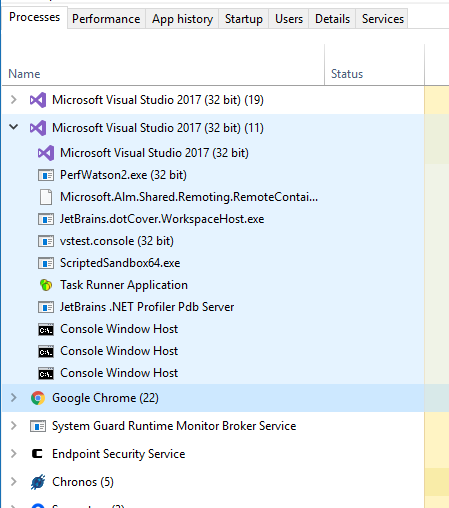
The “Processes” tab
As you can see, the processes running as 32-bit have an appended “32-bit” text. Please note, the task manager has “grouped” multiple processes together - you need to expand the list in order to see the individual processes!
The “Details” tab
- Right click on a column
- Ensure that "Platform" is checked
- Click OK
- See the "Platform" column for the bitness for a specific process.
How to create a memory dump
Using Task Manager
It’s crucial to take the memory dump using a tool running with the same bitness as the process whose memory you are going to take a memory dump.
- Determine the bitness of the process you want to take a memory dump of
- Ensure that the Task Manager (taskmgr.exe) is running with the same bitness
- If it's not running with the same bitness, you need to close the Task Manager, and then start a version with the proper bitness
- Press [WIN]+[R] ("Run")
- For 32-bit Task Manager, run: C:\Windows\SysWOW64\Taskmgr.exe
- For 64-bit Task Manager, run: C:\Windows\System32\Taskmgr.exe
- If you are uncertain, you can check that the bitness of the Task Manager is correct using the instructions above in this document.
- Right click on the process you want to take a memory dump of and click "Create Dump File"
- After a while, a dialog will popup with the path to the newly taken memory dump.
Related articles
10 Mar, 2023 core vpn ikev2 windows radius certificate
13 Jun, 2022 oneconnect macos ios windows android
28 Mar, 2023 ikev2 windows vpn routing splittunneling
28 Feb, 2024 oneconnect windows
29 Oct, 2021 sslvpn openconnect oneconnect windows
5 Feb, 2021 incontrol howto backup windows
9 Feb, 2024 core oneconnect windows splittunneling dns
21 Feb, 2023 ipsec certificate windows ca core
25 Feb, 2022 oneconnect windows howto
29 Mar, 2023 ipsec core windows vpn l2tp
16 Sep, 2020 vpn ipsec ikev2 windows howto dh
27 Aug, 2024 oneconnect windows
22 May, 2024 netwall ikev2 windows certificate vpn core
23 Aug, 2022 sslvpn openconnect oneconnect macos windows linux core


