Users open Clavister OneConnect, sign in with their normal AD account in a browser, and the VPN comes up. The firewall keeps no VPN users and no VPN passwords. Membership of one AD group decides who may connect.
This guide lets the firewall get its certificate from Let’s Encrypt by itself (ACME). Users see a public certificate everywhere, so client PCs need nothing but OneConnect: no CA to install, no CRL to publish or renew. The certificate is set to renew by itself.
Which setup? Use this one unless you must use your own CA; for that, use How to - Authenticate OneConnect users with IdAuth on Linux and your own CA. Both setups need TCP port 80 free on the firewall’s outside address, and public DNS names. Here, port 80 is where Let’s Encrypt checks that you control the name (the HTTP-01 check, which Let’s Encrypt allows only on port 80). This is one of four guides. The overview, How to - Authenticate OneConnect users with Clavister IdAuth on-premises, compares all four setups.
IdAuth is Clavister’s name for PhenixID Authentication Services; the product screens say PhenixID. In this guide, “the firewall” is your Clavister NetWall. “Reference setup” at the end lists the versions this was tested with.
One Linux host does all the IdAuth-side work: IdAuth itself, the reverse proxy, and the firewall upload. This guide calls it the IdAuth host.
Read this first
Three things must be right in this setup. The scripts handle them. You only need to know they exist, so that you do not undo them.
- The firewall reads IdAuth's discovery document through a small reverse proxy on the IdAuth host, not from the IdAuth listener. Step 5.
- The firewall matches plain group names. AD gives DNs, so IdAuth sends plain names. Step 4 sets that.
- The firewall must find the IdAuth name on the inside, and only there. If it asks a public DNS server, it gets its own outside address, reaches its own reverse proxy with the Let's Encrypt certificate instead of IdAuth, and stops trusting IdAuth. Step 6, check 4.
How the pieces fit:
| Who | Connects to | Certificate it sees |
|---|---|---|
| OneConnect | VPN_NAME on the firewall, port 443 | Let's Encrypt (oc_cert) |
| The user's browser | IDAUTH_URL: the firewall, PROXY_PORT | Let's Encrypt (oc_cert) |
| The firewall's reverse proxy | the IdAuth host, PLAIN_PORT, plain HTTP | none |
| The firewall itself, for discovery | IDAUTH_URL found inside: the IdAuth host, PROXY_PORT | the private CA (oc_ca) |
| The proxy on the IdAuth host | IdAuth, port 8443 | IdAuth's own |
The same name leads to the firewall from the internet, and to the IdAuth host from inside. “DNS, two views” in “Before you start” sets that up.
This guide does not cover these cases. Stop here and get help from your Clavister partner:
- port 80, 443 or PROXY_PORT on the firewall's outside address is already in use (for example by a web server), or old-style IP Rules or rule folders use those ports;
- the firewall already runs a OneConnect server;
- the firewall is an HA pair;
- the domain controller has no LDAPS.
Words you will meet:
| Word | Meaning here |
|---|---|
| ACME | The protocol the firewall uses to get and renew its Let's Encrypt certificate |
| Discovery document | A JSON page on IdAuth that tells the firewall where the sign-in page and the signing keys are |
| OIDC | OpenID Connect: the sign-in protocol between OneConnect, the firewall and IdAuth |
| Reverse proxy | A server that takes a web request and passes it on to another server |
| The proxy | In this guide, the small proxy on the IdAuth host (06-idauth-proxy.py). The firewall's own one is always called the firewall's reverse proxy |
| Relying party | The thing that asks IdAuth to sign a user in. Here: OneConnect and the firewall |
| Tenant | A short word in every IdAuth URL. You choose it |
| Claim | One field in the sign-in token, for example the user's groups |
| DN | An AD name written as a path, for example CN=VPN_Employees,CN=Users,DC=example,DC=com |
Fill in the sheet
The scripts. Download idauth-oidc-scripts-linux.zip and unpack it. It holds the scripts folder that this guide uses. The numbers in the script names are not the step numbers.
Most values below are used in more than one place. Fill in everything now except WAN_IF and LAN_IF: “Before you start” has you run the show commands of step 6, and check 2 shows them. On a cloud firewall a name can look like tap1a2b3c4d-5e.
In PowerShell, in the folder that holds scripts, make your own copy of the sheet:
copy scripts\sheet-example-letsencrypt.txt scripts\sheet.txt
notepad scripts\sheet.txt
Write your values from the table below into sheet.txt, and save it. Do this before you copy the folder to the IdAuth host. Steps 5 and 6 read the sheet with fill-sheet.py. It refuses a value that is missing, has a space, or is still an example (the public example addresses or example.com). It cannot check that a value such as 10.0.0.20 or If1 is right for your network: check those yourself.
In the rest of this guide, a name in capitals means “your value from the sheet”. Replace it before you press Enter. A name in front of = in a command, such as ORG= or IDAUTH_HOST=, stays as it is; replace only the value after =.
| Name | Example | What it is |
|---|---|---|
| VPN_NAME | vpn.example.com | The name users connect to. It must be in public DNS, pointing to FW_OUTSIDE_IP |
| IDAUTH_NAME | vpn.example.com | The name of the sign-in page. The same value as VPN_NAME: one certificate covers both. fill-sheet.py refuses another name |
| FW_OUTSIDE_IP | 203.0.113.10 | The public address users reach the firewall on. If a router or a cloud security group sits in front of the firewall, it is that device's public address |
| FW_MGMT_IP | 10.0.0.1 | The firewall address the IdAuth host reaches, for SSH. Usually its address on LAN_IF |
| FW_ADMIN | admin | The firewall admin account |
| WAN_IF | If1 | The firewall's outside interface, as the firewall names it |
| LAN_IF | If2 | The firewall's inside interface. DC_IP, LAN_NET and IDAUTH_IP must be behind it |
| IDAUTH_IP | 10.0.0.20 | The IdAuth host |
| PROXY_PORT | 9446 | The port of the sign-in page. Not 8443: IdAuth uses 8443 on the same host. Not 443 or 80: OneConnect and Let's Encrypt need them. If a router or cloud security group sits in front of the firewall, open this port there too |
| PLAIN_PORT | 9480 | A second port on the IdAuth host, where the firewall passes the users' requests on. Not used from outside |
| IDAUTH_URL | https://vpn.example.com:9446 | https://IDAUTH_NAME:PROXY_PORT. The firewall and the user's browser both use it |
| TENANT | corp | A short word, letters only. Becomes part of every OIDC URL |
| DC_IP | 10.0.0.10 | The domain controller, and the DNS server of the firewall and of VPN users |
| DOMAIN_DN | DC=example,DC=com | Your AD domain as a DN |
| SVC_DN | CN=svc-idauth,CN=Users,DC=example,DC=com | The service account IdAuth reads AD with |
| VPN_GROUP | VPN_Employees | The AD group whose members may use the VPN. The plain name, no spaces, never a DN |
| LAN_NET | 10.0.0.0/24 | The inside network VPN users may reach |
| VPN_POOL | 10.0.99.10-10.0.99.100 | Addresses for VPN clients. Must not overlap any network the firewall routes. Inside hosts must send replies for it back to this firewall |
| VPN_INNER | 10.0.99.1 | The firewall's own address in the pool's network, but not inside the pool range. Example: pool 10.0.99.10-10.0.99.100, inner 10.0.99.1 |
| USERS_SRC | 198.51.100.0/24 | Where users may reach the sign-in page from. Users at home need 0.0.0.0/0 (the whole internet). For the first test use 0.0.0.0/0, and narrow it when step 7 works: a phone hotspot has the mobile carrier's address, which a narrow range does not hold. It limits only the sign-in page; OneConnect on 443 answers everyone |
| VPN_PORTS | 443,445 | The TCP ports VPN users may reach inside |
| SYSLOG_IP | 10.0.0.20 | Where the firewall sends its log. The IdAuth host is fine |
| ACME_EMAIL | it@example.com | Your contact address for Let's Encrypt |
| TEST_USER | jdoe | A user in VPN_GROUP, for the tests |
| OTHER_USER | asmith | A user not in VPN_GROUP, for the refusal test |
Before you start
You need every item below. If one is missing, a later step fails.
Two machines. An admin PC on the inside, and a test PC on the internet that does not use your inside DNS (a laptop on a phone hotspot is enough). Step 7 needs both at the same time.
The firewall CLI. Many commands in this guide run on the firewall’s command line. Open it from your admin PC, in PowerShell: ssh FW_ADMIN@FW_MGMT_IP, or the address you manage the firewall on. The first time, type yes to the question about the key. The prompt ends in :/>. This guide writes Device:/>; your firewall shows its own name there. If SSH is refused, SSH management is not on for your PC: ask whoever set up the firewall.
A router in front of the firewall. If another router or a cloud security group sits in front of it, that device must pass TCP 80 (the Let’s Encrypt check), TCP and UDP 443 (OneConnect) and TCP PROXY_PORT (the sign-in page) to the firewall.
Look at step 6 now. Checks 2 to 5 of step 6 start with show commands, which change nothing. Run only these show commands now, and write down what checks 3 and 4 show; do not type the set lines yet. If check 5 finds port 80, 443 or PROXY_PORT taken, stop: this guide does not cover it.
Firmware. On the firewall CLI, about must show cOS Core 15.00.06 or later. This guide was tested on 15.00.06.10. The per-interface OneConnect certificate came in 15.00.02, and Chain certificates in 15.00.03. Upgrade first.
Licences. IdAuth needs its licence file (license.p12) to open its ports. NetWall needs SSL VPN in its licence. On the firewall CLI, license must show a Max SSLVPN Tunnels line above 0.
IdAuth media from Clavister. The container image tar and license.p12. Put both in the scripts folder.
The IdAuth host (IDAUTH_IP). A Linux server with Docker. Debian 13 with 2 vCPU, 6 GB RAM and 20 GB disk is enough. Give it a fixed address, with this firewall as its default gateway: sign-in requests reach the host with the users’ own addresses, and the answers must go back through this firewall. The host also needs outbound HTTP and HTTPS to the internet, for the apt lines below and the test tools in step 5. If you install Debian, leave the root password empty (then your own account gets sudo) and tick SSH server.
From your PC, in PowerShell, in the folder that holds scripts, copy it to the host and log in. <you> is your account on the host:
scp -r .\scripts <you>@IDAUTH_IP:
ssh <you>@IDAUTH_IP
Then, on the host:
sudo -i
cd /home/<you>/scripts
apt update && apt install -y openssl curl python3 python3-venv bind9-host
echo "IDAUTH_IP IDAUTH_NAME" >> /etc/hosts
getent hosts IDAUTH_NAME
If docker --version says command not found, also run apt install -y docker.io. The last line must print IDAUTH_IP: the host must find its own IdAuth name. To fix a wrong line: nano /etc/hosts (save with Ctrl+O and Enter, quit with Ctrl+X). Edit sheet.txt the same way. From now on, edit only this copy of sheet.txt, on the IdAuth host.
In this guide, “as root on the IdAuth host” means the window above: after sudo -i, in the scripts folder. Work as root, not with sudo in front of each command: sudo drops the NAME=value settings that steps 1 and 2 put in front of their commands.
In AD:
- a service account svc-idauth with a password that never expires;
- the group VPN_GROUP, with TEST_USER in it as a direct member. Groups inside the group do not count;
- OTHER_USER, not in the group.
On a DC, or a PC with the AD tools, as a domain admin:
$pw = Read-Host -AsSecureString "Password for svc-idauth"
New-ADUser -Name svc-idauth -SamAccountName svc-idauth -Enabled $true `
  -PasswordNeverExpires $true -AccountPassword $pw -Path "CN=Users,DOMAIN_DN"
New-ADGroup -Name VPN_GROUP -GroupScope Global -Path "CN=Users,DOMAIN_DN"
Add-ADGroupMember -Identity VPN_GROUP -Members TEST_USER
Then check them (if they exist already, only check them):
Get-ADUser svc-idauth -Properties PasswordNeverExpires | Select-Object Name, PasswordNeverExpires
Get-ADGroupMember VPN_GROUP | Select-Object -ExpandProperty SamAccountName
(Get-ADUser OTHER_USER -Properties MemberOf).MemberOf
(Get-ADUser svc-idauth).DistinguishedName
PasswordNeverExpires must be True. The group must list TEST_USER (this lists direct members only). The third command must not show VPN_GROUP. The last command prints your SVC_DN: write it into sheet.txt exactly.
On Samba AD, create them with samba-tool user create svc-idauth, samba-tool user setexpiry svc-idauth --noexpiry (or the password expires after 42 days and every sign-in fails), samba-tool group add VPN_GROUP and samba-tool group addmembers VPN_GROUP TEST_USER.
LDAPS on the DC. IdAuth reads AD over LDAPS, port 636. Check it now, as root on the IdAuth host:
openssl s_client -connect DC_IP:636 </dev/null 2>/dev/null | grep -c BEGIN
It must print 1. If not, stop here: the DC needs a certificate for LDAPS, which is a job for your AD team.
DNS, two views. At your public DNS provider, VPN_NAME points to FW_OUTSIDE_IP. Let’s Encrypt checks exactly this. Inside, IDAUTH_NAME points to IDAUTH_IP. Add the inside record as its own zone, so that it does not touch the rest of your domain. On the DC at DC_IP:
# Windows DNS
Add-DnsServerPrimaryZone -Name IDAUTH_NAME -ReplicationScope Domain
Add-DnsServerResourceRecordA -ZoneName IDAUTH_NAME -Name "@" -IPv4Address IDAUTH_IP
# Samba AD
samba-tool dns zonecreate DC_IP IDAUTH_NAME -U Administrator
samba-tool dns add DC_IP IDAUTH_NAME @ A IDAUTH_IP -U Administrator
The Windows lines print nothing. Check on the IdAuth host: host IDAUTH_NAME DC_IP must answer with IDAUTH_IP.
From now on every PC that uses this DNS gets the inside address for VPN_NAME. So use OneConnect from outside the office, and run the public check (6c) and step 7 on a PC that does not use your DNS. A phone hotspot is enough.
For Let’s Encrypt, the public name must have no AAAA (IPv6) record, unless that points to this firewall too: Let’s Encrypt tries IPv6 first. If the name or a parent name has a CAA record, it must allow letsencrypt.org. Check both on the IdAuth host, against a public DNS server:
host -t AAAA VPN_NAME 1.1.1.1
host -t CAA <name> 1.1.1.1
Run the second line once for each name from VPN_NAME up to your domain, with that name in place of <name>: for example vpn.example.com, then example.com. The first name that has a CAA record decides. The answers “has no AAAA record” and “has no CAA record” are fine.
The DC must also answer internet names (a Windows DC with forwarders does). The firewall will use it for everything, Let’s Encrypt included. Check: host www.clavister.com DC_IP on the IdAuth host must print an address.
Time. Firewall, IdAuth host and DC on the same NTP source. The token lives 2 minutes, so a clock that is a few minutes off fails every sign-in. On the IdAuth host, timedatectl must say System clock synchronized: yes. On the firewall CLI, time shows its clock and its time zone. It must be within a minute of date on the IdAuth host; date may use another time zone, often UTC.
A backup of the firewall, first. Before you change anything on the firewall, check on the firewall CLI that nothing is pending: show -changes must say There are no changes. (more in step 6, check 1). Then, from your admin PC, in PowerShell:
scp -O FW_ADMIN@FW_MGMT_IP:config.bak fw-before-oidc.bak
Use the address you manage the firewall on, if it is not FW_MGMT_IP. Keep the file in a safe folder: it holds the firewall’s secrets. It is your way back; see “Remove it again” at the end of this guide.
SSH from the IdAuth host to the firewall. Step 6 runs from the IdAuth host. As root on it:
ssh FW_ADMIN@FW_MGMT_IP
It must show the firewall’s prompt, which ends in :/>. This guide writes Device:/>; your firewall shows its own name there. Type exit to leave. If it says Connection timed out, the firewall’s SSH management does not allow this host. Add that from the PC you manage the firewall with today, in its SSH session:
Device:/> add RemoteManagement RemoteMgmtSSH ssh_idauth Interface=LAN_IF Network=IDAUTH_IP LocalUserDatabase=AdminUsers
Device:/> activate
Device:/> commit
AdminUsers is the firewall’s own admin database. If your admins log in through RADIUS, use the database of your existing SSH line instead (show RemoteManagement). Step 7 removes this line again at the end.
activate starts the new configuration. Then commit must follow within 30 seconds, or the firewall goes back to the old one by itself. This protects you from a change that cuts off your own access. commit answers Committed changes. This pair is used every time in step 6.
A syslog receiver at SYSLOG_IP. It is where you read the firewall’s errors. For the setup and the tests this is enough. Run it as root on the IdAuth host, in a second window. Keep that window open until the end of step 7; it stops when you close it. The firewall sends nothing to it before step 6b.
python3 -u - <<'EOF' | tee -a /root/fw.log
import socket
s = socket.socket(socket.AF_INET, socket.SOCK_DGRAM)
s.bind(("0.0.0.0", 514))
while True:
    print(s.recv(65535).decode(errors="replace"), flush=True)
EOF
The test PC needs OneConnect from the Microsoft Store. See Configure Clavister OneConnect for Windows towards Clavister NetWall, or Install OneConnect without Microsoft store for a PC without the Store.
Step 1 - The proxy’s certificate
The users never see this certificate; they see the firewall’s Let’s Encrypt certificate. Only the firewall checks this one, when it reads IdAuth through the proxy. As root on the IdAuth host:
ORG="Your Company" bash 02-make-proxy-cert.sh IDAUTH_NAME IDAUTH_IP
It writes to /opt/idauth-ca/: ca.crt (for the firewall, step 6) and idauth.crt, idauth.key (for the proxy, step 5). There is no CRL and nothing for the client PCs.
Check: ls /opt/idauth-ca/ lists, among others, ca.crt, idauth.crt and idauth.key. ca.key is the CA’s private key: it stays on this host, readable by root only.
Step 2 - Install IdAuth
As root on the IdAuth host:
BIND=IDAUTH_IP bash 01-idauth-container.sh pas_7.0.2-amd64.tar license.p12
Use the real file names. BIND keeps the IdAuth listener on one address. That listener also serves the admin portal, so it must not be on every interface.
Check:
docker ps --filter name=idauth
Expect one line for idauth, with STATUS Up ... (healthy). The script itself can take several minutes the first time; it prints health: starting until IdAuth is up.
Then open https://IDAUTH_IP:8443/config/ in a browser on the inside network. Accept the certificate warning; that listener keeps its own certificate, and users never see it.
The login page may be in Swedish. To change it, press the three dots at the top right and pick English under Språk. Sign in with the product default: user phenixid, password password. Change it at once: PHENIXID at the top right > Change password.
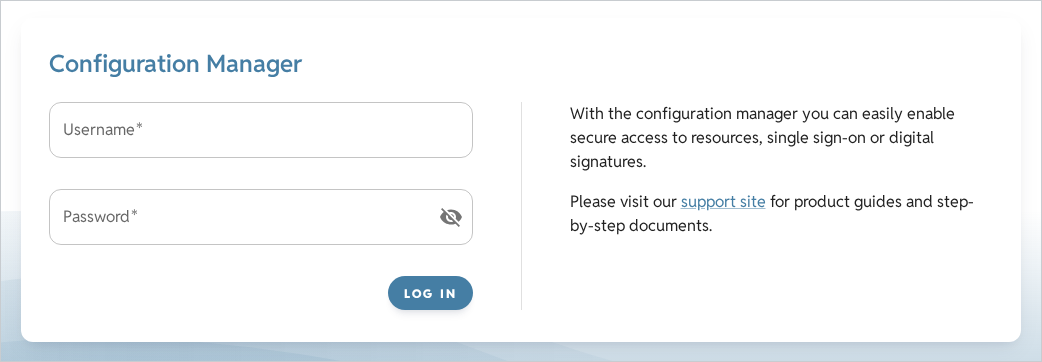
Step 3 - Four wizards in IdAuth
All four are under Scenarios: a tab bar at the top and a list of rows on the left, each with a +. Fill in only what is listed. Leave everything else as the wizard has it. Each wizard ends with a summary: press Create there.
If this IdAuth already serves other applications, still create everything new, as below. Do not reuse an existing OpenID Provider.
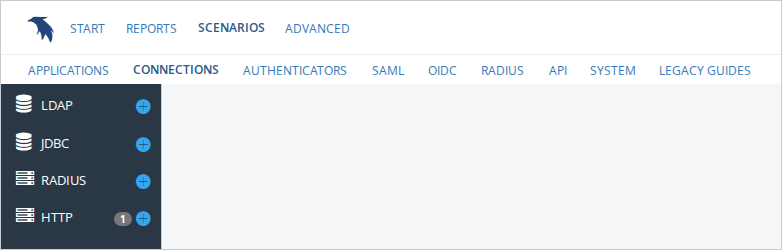
3a. LDAP connection
Scenarios > Connections > LDAP > +
| Screen | Field | Value |
|---|---|---|
| Connection Name | Name | AD-LDAPS |
| Connection Details | Host, Port | DC_IP, 636 |
| Credentials | Bind DN, Password | SVC_DN, its password |
| SSL | SSL | on |
| SSL | Trust all | on. See "Before you go live" |
After the SSL screen, the wizard shows Connection status: Not tested and a blue Test connection link under it. Press it: it must say Connection status: Success (OK when you test the saved connection later). The wizard also says the account needs read and write access. Read access is enough here (a normal domain user); do not give it more.
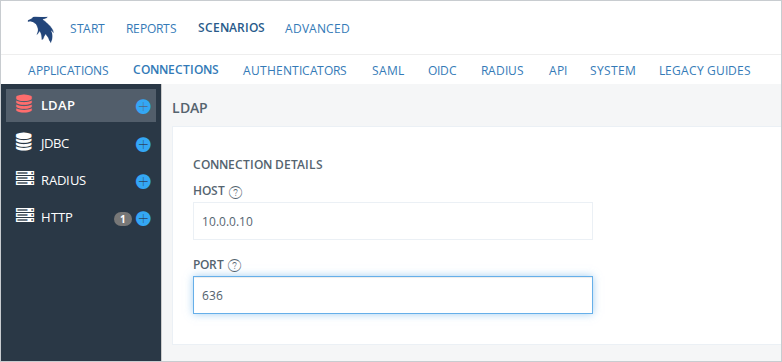
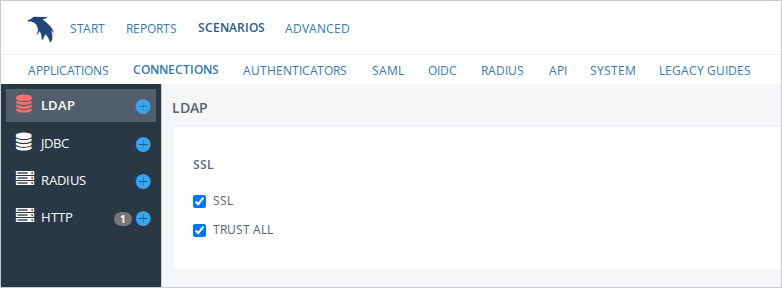
Check SSL on the saved connection, not the wizard’s summary: USE SSL/TLS and TRUST ALL ticked.
3b. Authenticator
Scenarios > Authenticators > Dynamic Authenticator > +
| Screen | Value |
|---|---|
| Scenario | AD-Username-Password |
| Authenticator alias | uidpwd |
| Select preset | Username & Password |
| User store | AD-LDAPS |
| Search filter | leave the default, as in the third picture below |
| Search base | DOMAIN_DN. The wizard usually fills it. If not, press Choose or type it |
| User identifier | sAMAccountName |
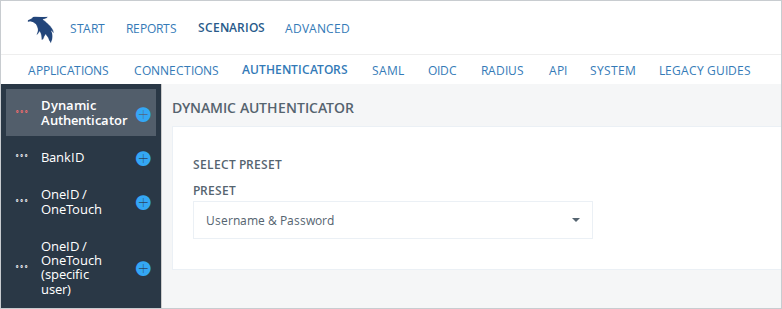
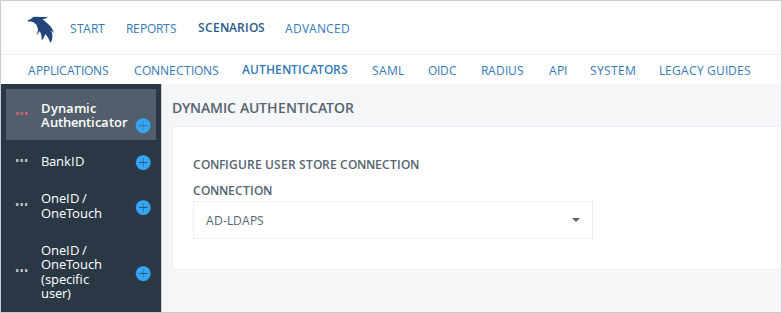
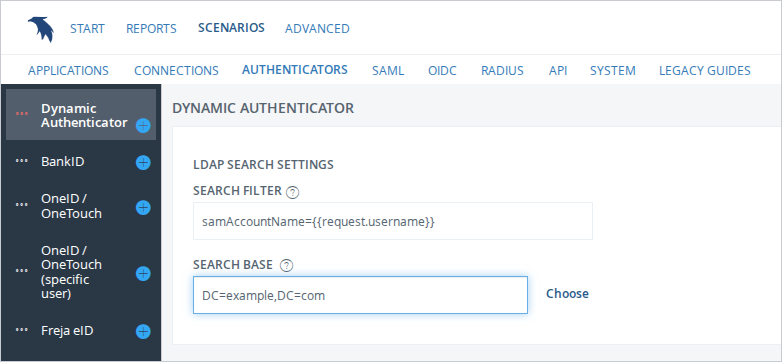
Use the Authenticators tab. Do not use Legacy guides: it sets up a client secret, and OneConnect signs in without one.
3c. Relying party
Scenarios > OIDC > Relying party > +
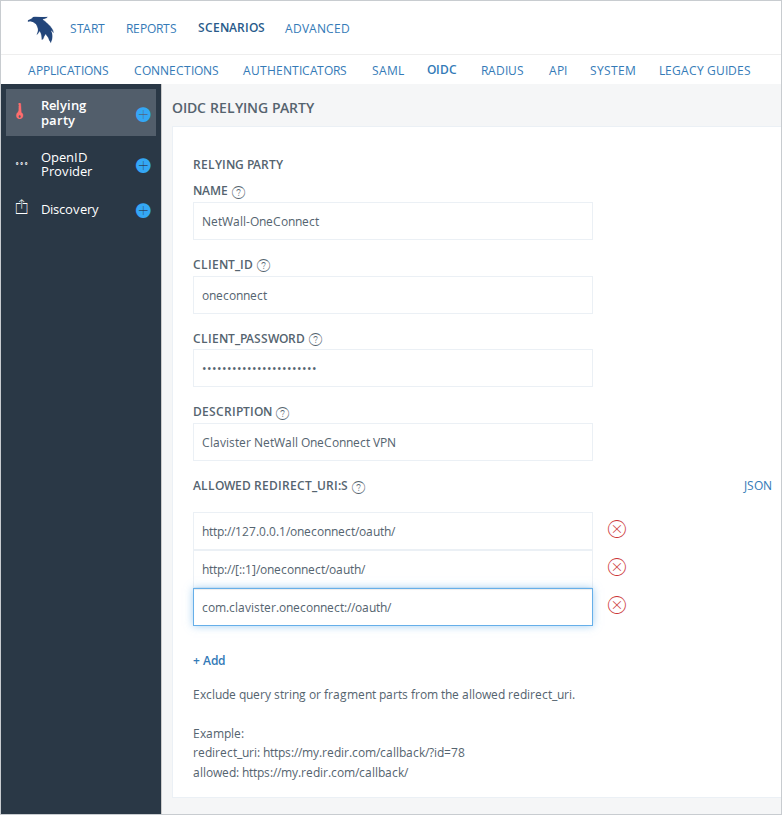
| Field | Value |
|---|---|
| NAME | NetWall-OneConnect |
| CLIENT_ID | oneconnect, exactly: the scripts expect this name |
| CLIENT_PASSWORD | anything. It is not used |
| DESCRIPTION | anything |
| ALLOWED REDIRECT_URI:S | the three lines below, one per + Add |
http://127.0.0.1/oneconnect/oauth/
http://[::1]/oneconnect/oauth/
com.clavister.oneconnect://oauth/
These three come from Clavister. Use exactly these.
3d. OpenID Provider
Scenarios > OIDC > OpenID Provider > +
| Screen | Value |
|---|---|
| Scenario | NetWall-OneConnect |
| Base URL | IDAUTH_URL. No path |
| Tenant | TENANT |
| Supported scopes | openid is filled in already. Leave it |
| Claims | add the three below |
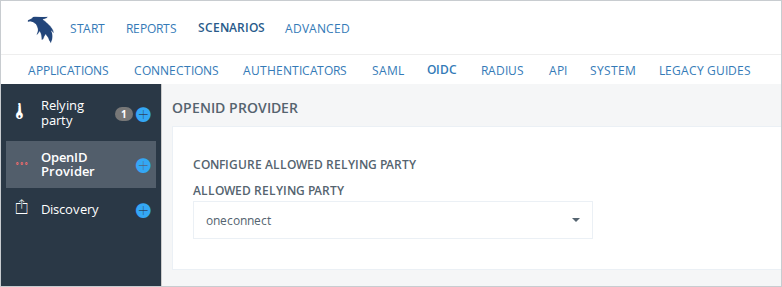
| Allowed relying party | select oneconnect. Nothing is selected by default |
| Authenticator | AD-Username-Password |
| Keystore | leave the default |
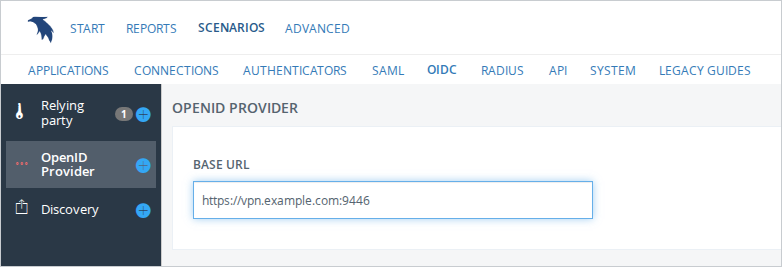
If you typed another address as Base URL, step 4 repairs it.
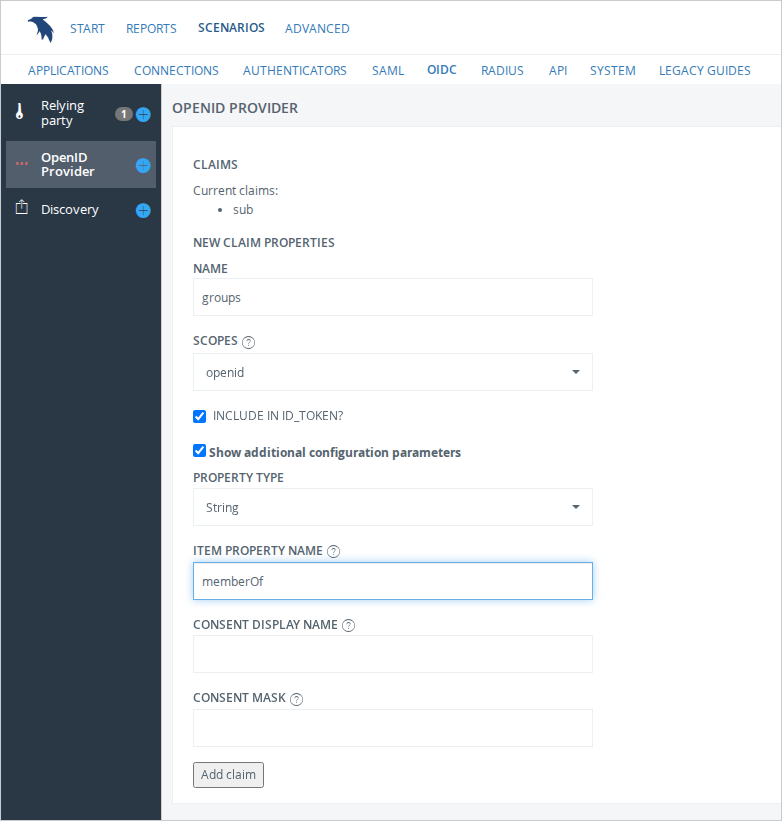
The three claims. For each claim: tick Show additional configuration parameters to see the field Item property name (the tick clears after every Add claim). Pick openid under Scopes (nothing is picked at first). Leave Include in id_token on. Press Add claim.
| Claim name | Item property name |
|---|---|
| groups | memberOf |
| given_name | givenName |
| family_name | sn |
Check, as root on the IdAuth host:
curl -sk https://IDAUTH_IP:8443/TENANT/.well-known/openid-configuration \
  | python3 -m json.tool | grep -E '"issuer"|"groups"'
Expect an "issuer" line and a line with "groups". The issuer should be IDAUTH_URL/TENANT. If it shows another address, go on; step 4 fixes it.
Step 4 - The settings outside the wizards
Up to seven more settings are needed. One script sets all of them. It changes only the oneconnect relying party, the OpenID Provider that allows it, and that provider’s authenticator (it adds one processing step). IdAuth is restarted, so sign-ins stop for about a minute; if other applications use this IdAuth, do it in a maintenance window.
Close every IdAuth portal tab first. An old tab can later save the old settings back.
If this IdAuth also serves other applications, first run the first line below with --dry-run added, and read every CHANGE line. Then, as root on the IdAuth host:
python3 07-idauth-fixup.py --proxy-url IDAUTH_URL
docker restart idauth
The script prints one line per setting. ok means it was already right. CHANGE means it set it. It backs up the configuration file first, and a second run says Nothing to change.
Check. Wait until docker ps shows (healthy) again, then:
curl -sk https://IDAUTH_IP:8443/TENANT/.well-known/openid-configuration | python3 -m json.tool | grep '"issuer"'
curl -sk https://IDAUTH_IP:8443/TENANT/.well-known/openid-configuration \
  | python3 -m json.tool | grep -A2 code_challenge
Expect "issuer": "IDAUTH_URL/TENANT", then "S256" and nothing else in that list.
Step 5 - The reverse proxy, and the full IdAuth test
The proxy runs twice on the IdAuth host, from the same script:
- on PROXY_PORT, with HTTPS: the firewall reads the discovery document here;
- on PLAIN_PORT, without TLS: the firewall passes the users' requests on to it, after its own reverse proxy has ended their TLS session with the Let's Encrypt certificate.
Both pass on only the paths the sign-in needs. Everything else, the admin portal included, gets the answer 404. As root on the IdAuth host:
cp 06-idauth-proxy.py /usr/local/bin/
python3 fill-sheet.py sheet.txt idauth-proxy.service /etc/systemd/system/idauth-proxy.service
python3 fill-sheet.py sheet.txt idauth-proxy-http.service /etc/systemd/system/idauth-proxy-http.service
systemctl daemon-reload && systemctl enable --now idauth-proxy idauth-proxy-http
journalctl -u idauth-proxy -u idauth-proxy-http --since "-5 min"
The log must show terminating TLS on 0.0.0.0:PROXY_PORT, plain HTTP on 0.0.0.0:PLAIN_PORT, and twice relaying only: /TENANT/, /authentication/, /web-app/, /lang/. A line NOTE: the hop to IdAuth is not checked is normal here: the proxy and IdAuth are on the same host.
Check 1:
curl -s --cacert /opt/idauth-ca/ca.crt \
  https://IDAUTH_NAME:PROXY_PORT/TENANT/.well-known/openid-configuration \
  | python3 -m json.tool | grep '"issuer"'
curl -sk --path-as-is -o /dev/null -w "%{http_code}\n" https://IDAUTH_NAME:PROXY_PORT/TENANT/../config/
Expect "issuer": "IDAUTH_URL/TENANT", then 404.
Check 2, the real test. It signs in as TEST_USER in a headless browser and checks the token the way the firewall will. Install it once. It takes about a minute and needs about 1 GB of disk:
python3 -m venv /opt/oidc-test
/opt/oidc-test/bin/pip install playwright requests cryptography
/opt/oidc-test/bin/playwright install --with-deps chromium
Run it. The first line asks for the test user’s password without showing it:
read -s -p "TEST_USER password: " IDAUTH_PW; export IDAUTH_PW; echo
IDAUTH_HOST=IDAUTH_NAME IDAUTH_PORT=PROXY_PORT IDAUTH_TENANT=TENANT \
IDAUTH_CA=/opt/idauth-ca/ca.crt IDAUTH_USER=TEST_USER \
/opt/oidc-test/bin/python 05-verify-oidc.py
unset IDAUTH_PW
The script finds IDAUTH_NAME through the normal name lookup. Do not add IDAUTH_IP= to this command: in this script it replaces that lookup.
Expect three PASS rows and All checks passed. The first row also shows signature OK and a groups: line such as ['VPN_Employees,Sales']. That is one string with commas in it, which is correct: the firewall splits it on the comma.
- groups: shows CN=... values: IdAuth was not restarted after step 4.
- Row 1 says FAIL no authorization code: a wrong password, TEST_USER not under the search base (3b), or a locked account.
- A row says INCONCLUSIVE: the run could not decide. Check the password and run again. It is not a pass.
Do not go to step 6 until this passes. After this point a problem is much harder to find.
Step 6 - The firewall
Step 6 runs as root on the IdAuth host: SSH to the firewall in one window, and the host’s own commands in another.
Before you run anything: five checks
The backup. You took it in “Before you start”. If anyone has changed the firewall since then, take a new one the same way. A new backup also holds the SSH line from “Before you start”; after a restore from it, delete that line again (end of step 7).
The firewall script only adds objects, and every object it adds starts with oc. It does not change interfaces, routes, existing rules or the management certificate. Checks 3 and 4 below may change two global settings; write the old values down. The script cannot know these five things. Check them in an SSH session to FW_MGMT_IP.
1. Nothing is pending.
Device:/> show -changes
It must say There are no changes. The single line One or more indexed objects have been moved. is also fine. If objects are listed, someone has unsaved work: ask them first. Then activate and commit, or throw it away with reject -all. Tell the other admins not to change anything until step 6 is done.
2. Interface names. show Interface Ethernet lists them (show Interface lists every kind of interface, most of them empty). The outside one is the one your internet line is on. Put the outside one in WAN_IF and the inside one in LAN_IF in sheet.txt. Then check the outside address object:
Device:/> show Address IP4Address InterfaceAddresses/If1_ip
Use your WAN_IF in place of If1. It must print an object. With DHCP on the outside interface (usual in a cloud), Address is 0.0.0.0 and ActiveAddress shows the real address. That is fine. If show prints no object, your outside interface is not a plain Ethernet interface with its own address object. The guide was not tested that way; get help.
3. The WebUI ports. show Settings RemoteMgmtSettings. OneConnect needs 443, and Let’s Encrypt needs 80 (it checks there that you control the name), even if no rule lets anyone reach the WebUI there. Move only the one that is in the way, and write down the old value:
Device:/> set Settings RemoteMgmtSettings WWWSrv_HTTPSPort=4443
Device:/> set Settings RemoteMgmtSettings WWWSrv_HTTPPort=8080
Device:/> activate
Device:/> commit
Run the first line only if WWWSrv_HTTPSPort is 443, and the second only if WWWSrv_HTTPPort is 80. Pick free ports, and not PROXY_PORT. Tell the other admins the new ports. If you reach the WebUI through a router or a cloud security group, open the new port there too. Do that before you type activate: commit must follow within 30 seconds.
4. The firewall’s own DNS. The firewall must resolve IDAUTH_NAME to IDAUTH_IP, and it must never ask a public DNS server instead. show DNS lists its servers. Write them down. Then use the DC only:
Device:/> set DNS DNSServer1=DC_IP DNSServer2="" DNSServer3=""
Device:/> activate
Device:/> commit
A second DC is fine as DNSServer2; a public server is not. With a public server in the list, the firewall can get its own outside address for IDAUTH_NAME, reach its own reverse proxy instead of IdAuth, and stop trusting IdAuth.
This changes name lookups for the whole firewall: rules with names, IPsec peers, NTP and log servers given by name, updates, the licence and Let’s Encrypt. If your configuration uses names, check that the DC answers them the same way as your old servers.
Then check:
Device:/> ping IDAUTH_NAME
Sending 1 4-byte ICMP ping to 10.0.0.20 from 10.0.0.1
Device:/> ping www.clavister.com
The first line of the first ping must show IDAUTH_IP. The second ping must show an address: the firewall still finds internet names, which Let’s Encrypt needs. The ping answers themselves do not matter. The ping only shows that the DC answers; the real proof is oidc in 6c.
5. The outside address is free. OneConnect needs TCP and UDP 443 on FW_OUTSIDE_IP, Let’s Encrypt needs TCP 80 (it checks there that you control the name), and the sign-in page needs PROXY_PORT.
Device:/> show IPRule
Device:/> show IPPolicy
Device:/> show Interface OneConnectInterface
What to look for:
- show IPRule: on an older configuration it lists the old-style IP rules too. On a configuration made on 15.x it answers Invalid object type, which is fine.
- show IPPolicy: it lists IP policies and reverse proxy policies. On an empty rule set it prints a list of types, then There is no object of the type IPPolicy., which is fine.
- In both lists, look for entries with source interface WAN_IF or any that allow, forward (SAT) or reverse-proxy traffic to the outside address on port 80, 443 or PROXY_PORT. Services such as http, https, http-all or all_services cover those ports; for a service with another name, show Service ServiceTCPUDP <name> shows its ports. Such an entry means the port is taken, and this guide does not cover that.
- A Deny entry, such as a closing deny-all, is fine: 6c puts the new entries above it. A Deny for port 80 does not stop Let's Encrypt either.
- show Interface OneConnectInterface must say There is no object of the type OneConnectInterface.
6a. The certificates
Let’s Encrypt. On the firewall:
Device:/> add ACMEAccount oc_acme Email=ACME_EMAIL AcceptTerms=Yes
Device:/> cc ACMEAccount oc_acme
Device:/oc_acme> add ACMECertMgmt oc_cert Domains=VPN_NAME
Device:/oc_acme> cc
Device:/> activate
Device:/> commit
AcceptTerms=Yes accepts the Let’s Encrypt subscriber agreement. Read it first; it is on letsencrypt.org. The firewall then asks Let’s Encrypt for a certificate. Let’s Encrypt checks that you control VPN_NAME by fetching a file from the firewall on port 80 (the HTTP-01 check; Let’s Encrypt allows no other port for it). The firewall answers that by itself; no rule is needed. Wait a minute, then:
Device:/> acme -num=5
Device:/> show Certificate
- acme -num=5 must show oc_cert with a date under Validity and the status Downloaded or Issued. It usually takes less than a minute.
- show Certificate must list oc_cert with type Chain. A + in front of it means it is not saved yet; the activate and commit below save it.
- It is set to renew by itself 30 days before it expires; acme -show oc_acme/oc_cert shows the date.
- If acme fails, fix the cause before you try again, and ask your Clavister partner how to start a new try. Let's Encrypt limits failed tries and repeat certificates (letsencrypt.org/docs/rate-limits): at most 5 certificates for the same name in 7 days. Every new setup orders one, and so does every restore of a saved configuration that holds oc_cert.
The proxy’s CA, for the firewall only. As root on the IdAuth host:
scp -O /opt/idauth-ca/ca.crt FW_ADMIN@FW_MGMT_IP:certificate/oc_ca
It asks for the firewall password and prints nothing when it works. Ignore the exit code of scp; show Certificate is the proof. -O selects the SCP protocol that the firewall uses; if your scp does not know -O, leave it out. On the firewall, show Certificate must now also list oc_ca with type Remote. Then activate and commit, so that a reject -all in 6b cannot remove it or oc_cert.
6b. The objects
If you already send the firewall log to a syslog server, you may delete the oc_log line from 03-netwall-letsencrypt.sgs first. Then look for the firewall’s messages in your own log server, not in /root/fw.log, and leave out delete LogReceiverSyslog oc_log in “Remove it again”. Then, as root on the IdAuth host:
python3 fill-sheet.py sheet.txt 03-netwall-letsencrypt.sgs oidc.sgs
scp -O oidc.sgs FW_ADMIN@FW_MGMT_IP:script/oidc.sgs
fill-sheet.py prints the values that go into the firewall script. Read them once. scp prints nothing; ignore its exit code. On the firewall, script must list oidc.sgs. If scp says Permission denied, a script with that name is already on the firewall (or the password was wrong): run script -remove -name=oidc.sgs on the firewall and upload again.
On the firewall:
Device:/> script -execute -name=oidc.sgs
Device:/> activate
Device:/> commit
script -execute ends with There are no errors. when every line worked. You type activate yourself, after the script. When commit has answered, delete the file from the firewall:
Device:/> script -remove -name=oidc.sgs
It is not needed any more. With it gone, the next upload works and old values cannot run by mistake.
If a line fails, the run stops at that line and does nothing after it. Do not run the file again: it would stop at line 1 with already exists. Instead:
Device:/> reject -all
Device:/> script -remove -name=oidc.sgs
Then fix the value in sheet.txt, fill, upload and run again.
What the script creates: the log receiver oc_log, address and service objects, the OIDC provider oc_idauth, the user group oc_vpn_group, the OneConnect server oc-vpn with the Let’s Encrypt certificate and split tunnel, the reverse proxy policy oc-publish-idauth, and three IP policies for VPN users.
6c. Rule order, then the checks
The four new entries land at the end of the rule set, below any deny-all. Move them to the top. Run these lines in exactly this order, last rule first:
Device:/> set IPPolicy oc-vpn-deny Index=1
Device:/> set IPPolicy oc-vpn-to-lan Index=1
Device:/> set IPPolicy oc-vpn-dns Index=1
Device:/> set ReverseProxyPolicy oc-publish-idauth Index=1
Device:/> activate
Device:/> commit
Each move puts an entry at the top, so the one moved last ends up first. At the top they cannot be overridden by a broader rule of yours. They do not change your other traffic: three match only traffic from the VPN, and the reverse proxy matches only PROXY_PORT on the outside address, which check 5 found free.
If your rule set starts with drop rules for internet traffic (geo-blocking, block lists), keep oc-publish-idauth below them. Then do it in this order instead: show IPPolicy, note the index N of the first entry below your drop rules, run set ReverseProxyPolicy oc-publish-idauth Index=N, and then only the three set IPPolicy lines. The check below then shows the three VPN entries, your drop rules, then oc-publish-idauth.
Then check:
Device:/> show IPPolicy
The first four must be oc-publish-idauth (type RevProxy), oc-vpn-dns, oc-vpn-to-lan and oc-vpn-deny, in that order. The table shortens long names (oc-pu..., oc-vp...), so read the other columns: first RevProxy, then Allow to oc_dc_dns, Allow to oc_lan_net (shown as oc_lan...), and Deny to all-nets.
Device:/> oidc -refresh
Device:/> oidc
Expect Status : Discovery completed and Loaded keys of 1 or more.
Device:/> userauth -privilege
Expect a line like "VPN_Employees" 13: your group name and its length.
The public check. On a PC on the internet that does not use your inside DNS (a phone hotspot is enough), open https://IDAUTH_NAME:PROXY_PORT/TENANT/.well-known/openid-configuration in a browser. It must open with no certificate warning and show a JSON page with an "issuer" line. The certificate is from Let’s Encrypt. The test PC’s public address must be inside USERS_SRC.
Step 7 - The client
Copy scripts\04-windows-client.ps1 to C:\temp on the test PC (create the folder if it is not there), any way you like: it is not secret. There is no CA file to copy. On the PC, signed in as the user who will use OneConnect, open a normal PowerShell, not as administrator: OneConnect must start as that user, to take the profile link and show the right status. Then:
cd C:\temp
powershell -ExecutionPolicy Bypass -File .\04-windows-client.ps1 -VpnName "Company VPN" `
  -Server VPN_NAME -SignInPort PROXY_PORT
-ExecutionPolicy Bypass is needed because a Windows PC does not run scripts by default. The script checks the sign-in page and must print Sign-in address https://VPN_NAME:PROXY_PORT/ answers, and this PC trusts its certificate. Then OneConnect opens with the profile filled in. Press Save. If no profile window opens, close OneConnect completely and run the script again.
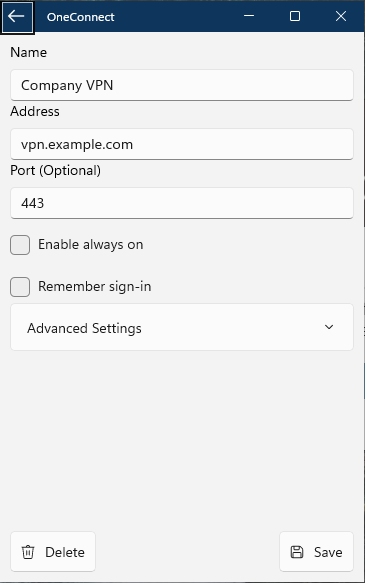
In OneConnect, pick Company VPN in the drop-down under the logo, then press Connect. Connect stays grey until a profile is picked.
A browser opens on the IdAuth sign-in page. Sign in at once as TEST_USER: the user name only, as in jdoe, and the AD password. OneConnect waits about two minutes for the sign-in (measured in the lab). If the browser shows 127.0.0.1 refused to connect after you signed in, that time had run out: press Connect again and sign in at once. The page is in Swedish: Användarnamn is the user name and Lösenord the password. The browser then shows Authentication complete. Close it.
OneConnect then shows Connected.
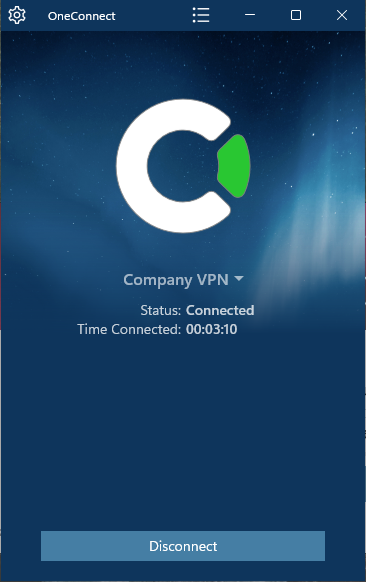
Check on the firewall:
Device:/> userauth -list
Expect TEST_USER, an address from VPN_POOL, interface oc-vpn, and VPN_GROUP under Privileges.
Check on the PC, in PowerShell:
Resolve-DnsName IDAUTH_NAME -Server DC_IP
Test-NetConnection DC_IP -Port 445
The first must answer with IDAUTH_IP (an extra SOA row is normal): DNS works through the VPN. The second must say TcpTestSucceeded : True if DC_IP is in LAN_NET and 445 is in VPN_PORTS. Only LAN_NET goes through the VPN; the PC’s internet traffic does not.
The refusal test. In OneConnect press Disconnect. Close every browser window, so the old sign-in is gone. Press Connect and sign in as OTHER_USER.
The browser still says Authentication complete: IdAuth accepted the password. Then OneConnect shows Connection failed and You are not authorized to log in. That is the group rule working. On the IdAuth host, grep -a user_group_disallow /root/fw.log | tail -1 shows the firewall’s reason. The file keeps older lines: the time in that line must be now, on the firewall’s clock (time). If OTHER_USER gets in, check userauth -privilege again.
The firewall log also shows oc-vpn-deny drops of Windows broadcast and multicast from connected PCs (UDP 137 and 1900, IGMP). That is normal.
Remove the SSH line if you added one in “Before you start”. Do it from your admin PC, not from the IdAuth host, whose session this line allows:
Device:/> delete RemoteManagement RemoteMgmtSSH ssh_idauth
Device:/> activate
Device:/> commit
The setup is done.
Remove it again
There are two ways back. Use one of them, not both.
The backup. It puts back the whole configuration from when you took it, the WebUI ports and DNS servers included. It also undoes every change anyone made after the backup. From your admin PC, in PowerShell, in the folder that holds fw-before-oidc.bak:
scp -O fw-before-oidc.bak FW_ADMIN@FW_MGMT_IP:
Ignore the exit code of scp. The firewall loads the file as a pending change. Then, on the firewall, activate and commit. If the backup is from after you added the SSH line, delete that line again, as at the end of step 7.
The delete list. It removes only what this guide added. From your admin PC, on the firewall, in this order (the things that use an object first):
Device:/> delete IPPolicy oc-vpn-deny
Device:/> delete IPPolicy oc-vpn-to-lan
Device:/> delete IPPolicy oc-vpn-dns
Device:/> cc ReverseProxyPolicy oc-publish-idauth
Device:/1(oc-publish-idauth)> delete ReverseProxyProfileMap 1
Device:/1(oc-publish-idauth)> cc
Device:/> delete ReverseProxyPolicy oc-publish-idauth
Device:/> delete Interface OneConnectInterface oc-vpn
Device:/> delete OIDCProvider oc_idauth
Device:/> delete UserGroup oc_vpn_group
Device:/> delete Service ServiceTCPUDP oc_svc_idauth
Device:/> delete Service ServiceTCPUDP oc_svc_allowed
Device:/> delete Address IP4Address oc_lan_net
Device:/> delete Address IP4Address oc_proxy_ip
Device:/> delete Address IP4Address oc_dc_dns
Device:/> delete Address IP4Address oc_pool
Device:/> delete Address IP4Address oc_inner
Device:/> delete Address IP4Address oc_users_src
Device:/> delete LogReceiverSyslog oc_log
Device:/> delete Certificate oc_ca
Device:/> cc ACMEAccount oc_acme
Device:/oc_acme> delete ACMECertMgmt oc_cert
Device:/oc_acme> cc
Device:/> delete ACMEAccount oc_acme
Device:/> delete Certificate oc_cert
Device:/> activate
Device:/> commit
If show RemoteManagement RemoteMgmtSSH still lists ssh_idauth, delete it as at the end of step 7. Then put back the WebUI ports and DNS servers you wrote down in checks 3 and 4. Leave out what you did not change, and write an empty old value as "":
Device:/> set Settings RemoteMgmtSettings WWWSrv_HTTPSPort=443 WWWSrv_HTTPPort=80
Device:/> set DNS DNSServer1=<old 1> DNSServer2=<old 2> DNSServer3=<old 3>
Device:/> activate
Device:/> commit
Device:/> show -changes
show -changes must say There are no changes. After this the WebUI is on its old ports again. If script (it lists the uploaded scripts) still shows oidc.sgs, also run script -remove -name=oidc.sgs.
After either way, on the IdAuth host: systemctl disable --now idauth-proxy idauth-proxy-http. The inside DNS zone, the AD objects and IdAuth itself stay; remove them by hand if you want.
Before you go live
- The sign-in page is a password prompt for your AD, on the internet. Anyone in USERS_SRC can try passwords there, and failed tries can lock accounts. Keep USERS_SRC as narrow as you can, check your AD lockout policy, and plan MFA in IdAuth (not tested here).
- The hop from the firewall to PLAIN_PORT is plain HTTP, passwords and tokens included, on your inside network. The plain port refuses private (RFC 1918) and loopback source addresses, so inside machines with such addresses cannot use it directly. Users who reach the outside address from a private address, for example over a site-to-site VPN, are refused too. A DMZ interface for the IdAuth host would keep the hop off the user network; that was not tested.
- Port 80 and the WebUI. Every renewal repeats the Let's Encrypt check on port 80. Keep the WebUI off 80 and do not publish anything else on 80 of the outside address.
- Every new VPN session needs IdAuth. Tunnels that are up should stay up; that was not tested. Plan a second IdAuth node, or a second way in.
- Removing a user from VPN_GROUP works at the next sign-in. It should not end a running tunnel (not tested). IdAuth also issues refresh tokens for 24 hours and remembers sign-ins (Allow SSO). If "disable the account and access is gone" must be true, shorten the refresh token lifetime and turn off Allow SSO, on the OpenID Provider edit page in IdAuth.
- What must keep running: the idauth container, and idauth-proxy and idauth-proxy-http on the IdAuth host.
- Trust all (step 3a) must be off in production. With it on, IdAuth accepts any DC certificate, so a machine that pretends to be the DC gets the users' passwords. See "Turn off Trust all" below.
- The sign-in page opens in Swedish. Each user can switch it once: the settings button at the top right of the page (Inställningar), then Språk > English. The browser remembers it.
- The firewall log. oc_log sends the whole firewall log to SYSLOG_IP. Point it at your real log server, or delete LogReceiverSyslog oc_log.
- Renewals. The Let's Encrypt certificate is set to renew by itself. The first renewal is after 60 days and was not tested for this guide. Check acme -num=5 the morning after the date acme -show oc_acme/oc_cert gives. Renewals run only in the account's time window, 22:00 to 23:00 by default (CertRenewTimeStart, CertRenewTimeStop). If show -changes then lists oc_cert, activate and commit; do not reject -all it. Restoring a saved configuration makes the firewall order a new Let's Encrypt certificate at once.
- The proxy's certificate. idauth.crt lasts 397 days: run step 1 again with FORCE_REISSUE=yes in front, then systemctl restart idauth-proxy. Its CA lasts 825 days; a new CA means uploading oc_ca again (6a). The SSH line from "Before you start" is gone by then: upload from your admin PC, or add the line again for the upload and delete it after.
- After any later change in the IdAuth portal, run step 4 again. If it prints CHANGE lines, restart IdAuth as in step 4.
- The proxy is the only front end that was tested. Its services limit memory and tasks, and it refuses request bodies over 64 KB. That protects the host; a flood of slow connections can still block sign-ins. nginx and HAProxy were not tested.
- Rolling out to many PCs. Nothing needs to go to the PCs but OneConnect and the profile. The profile is set up in the user's own session (not as SYSTEM), with a click on Save. Do not e-mail profile links: a link that sets up a VPN looks like phishing. Edge offers to save the AD password on the sign-in page; turn that off by policy (PasswordManagerEnabled) if you do not want AD passwords in browsers. Rollout was not tested.
Turn off Trust all. IdAuth checks the DC against the Java trust store inside its container, not against the host. Give it the certificate of the CA that issued the DC’s LDAPS certificate. To see which CA that is, as root on the IdAuth host:
openssl s_client -connect DC_IP:636 </dev/null 2>/dev/null | grep issuer=
With AD CS it is the AD CS root CA, or the issuing CA below it if your AD CS has two levels. With Samba AD, copy /var/lib/samba/private/tls/ca.pem from the DC to the IdAuth host as dc-ca.cer. With AD CS, export that CA certificate on any domain-joined Windows PC, in PowerShell:
Get-ChildItem Cert:\LocalMachine\Root | Where-Object Subject -like "*<the DC's CA name>*" |
  Select-Object -First 1 | Export-Certificate -FilePath .\dc-ca.cer
Use a part of the name that matches only one CA. A domain-joined PC lists the CA twice (it comes from two stores), so the line takes the first. An issuing CA below the root is in Cert:\LocalMachine\CA instead of Cert:\LocalMachine\Root. Copy dc-ca.cer to the IdAuth host. There, as root, in the folder that holds it:
docker exec -i idauth keytool -importcert -cacerts -storepass changeit -noprompt \
  -alias dc-ldaps-ca < dc-ca.cer
docker restart idauth
It must say Certificate was added to keystore. changeit is the standard password of that trust store. Then in the IdAuth portal: Scenarios > Connections > LDAP > AD-LDAPS, untick Trust all, press Save, then Test connection: it must say Connection status: OK. Close the portal tab, run step 4 again, and run the step 5 test again. If Test connection says Failure, tick Trust all again and press Save, so that users can sign in. Most likely dc-ca.cer is not the CA that the issuer= line printed.
A new container starts with a fresh trust store. After every IdAuth upgrade, and after 01-idauth-container.sh with FORCE=yes, run the two lines above again. Until you do, Test connection says Failure and nobody can sign in.
Keep IdAuth and the DC on a server network, not on the network of users’ PCs. With Trust all off, IdAuth accepts a DC certificate that a CA in its trust store signed: the DC’s CA, or one of the public CAs that Java trusts. Host can stay DC_IP.
If it does not work
Find the first row that matches what you see. Do what it says. Then go back to the check you were on. The syslog from “Before you start” is the fastest way to see the reason.
| What you see | Step | Do this |
|---|---|---|
| sudo: command not found | before | Debian was installed with a root password. su -, apt install sudo, usermod -aG sudo <you>, then log in again |
| ssh FW_ADMIN@FW_MGMT_IP times out | before | SSH management does not allow this host. Add ssh_idauth as in "Before you start" |
| 02-make-proxy-cert.sh: Permission denied | 1 | Not root. sudo -i first, and start the script with bash as shown |
| The idauth container restarts and never gets healthy | 2 | The licence is missing, or mounted as a file. ls /opt/pas-license/ must show license.p12 |
| 01-idauth-container.sh refuses to publish on every interface | 2 | BIND=IDAUTH_IP is missing. Work as root, with BIND in front |
| Test connection fails in the LDAP wizard | 3a | SSL is not on, LDAPS is not up on the DC (run the openssl s_client check again), or the Bind DN is not exactly SVC_DN or its password is wrong |
| 07-idauth-fixup.py: no relying party or no OpenID Provider allows | 4 | A wizard was skipped, or Allowed relying party was left empty in 3d |
| 05-verify-oidc.py: Temporary failure in name resolution | 5 | The host cannot resolve IDAUTH_NAME. Add the /etc/hosts line from "Before you start" |
| 05-verify-oidc.py: row 1 FAIL no authorization code | 5 | Wrong password, TEST_USER not under the search base (3b), or the account is locked |
| 05-verify-oidc.py: groups shows CN=... | 5 | IdAuth was not restarted after step 4. docker restart idauth |
| fill-sheet.py: FileNotFoundError for sheet.txt | 5, 6 | The file is not in the scripts folder, or Windows saved it as sheet.txt.txt. ls shows it; mv sheet.txt.txt sheet.txt |
| 07-idauth-fixup.py: any other ERROR line | 4 | The line names the wizard or setting to fix. Fix it in the portal, close the tab, run step 4 again |
| fill-sheet.py: NOT WRITTEN | 5, 6 | It names the value that is missing, has a space, or is still an example. Fix sheet.txt |
| acme stays at Ready chall... or fails | 6a | Let's Encrypt cannot reach port 80 on FW_OUTSIDE_IP: public DNS for VPN_NAME, an upstream router or security group, an entry that forwards port 80 elsewhere (check 5), or the WebUI still on 80 (check 3). Ask your Clavister partner how to start a new try |
| acme fails, and the name has an AAAA record, or it or a parent name has a CAA record | 6a | Let's Encrypt tries IPv6 first: remove the AAAA record or point it to this firewall. A CAA record must allow letsencrypt.org |
| acme shows nothing for oc_cert | 6a | The ACME objects were not activated and committed |
| script -execute stops: Command failed (oidc.sgs: Line N) | 6b | Read the error above it. reject -all, script -remove -name=oidc.sgs, fix sheet.txt, fill, upload, run again |
| oidc says Discovery retry (OIDC Provider identity could not be verified); the log has error_code=2050 | 6c | The firewall found IDAUTH_NAME on its own outside address. Check 4: DNS servers inside only, then oidc -refresh |
| oidc says Discovery retry with no identity error | 6c | The firewall does not reach the proxy: systemctl status idauth-proxy, and the route to IDAUTH_IP |
| The public check hangs | 6c | First: the test PC's public address is not in USERS_SRC. Use 0.0.0.0/0 for the test |
| The public check hangs, and the log has event=failed_to_reach_server ... conndestport=PLAIN_PORT | 6c | The firewall does not reach PLAIN_PORT: systemctl status idauth-proxy-http, the IdAuth host's default gateway, a local firewall on the host |
| The public check shows a certificate warning | 6c | First: the PC uses your inside DNS and reached the IdAuth host directly. Use a phone hotspot. If not that: show Certificate (oc_cert must be type Chain) and acme -num=5 (it must show oc_cert issued) |
| The proxy log says REFUSED client ... (private address, --refuse-private) | 6c | Something on the inside talks to PLAIN_PORT directly. Only the firewall's reverse proxy should |
| The log has error_code=2061 "No public key loaded" at sign-in | 7 | Discovery failed earlier. Fix it (the two Discovery retry rows), then oidc -refresh |
| Connect does nothing, no browser opens | 7 | The PC does not reach VPN_NAME on 443, or the name does not resolve publicly |
| The sign-in page shows empty fields with no labels | 7 | The proxy blocks /lang/. The --allow list must be /TENANT/,/authentication/,/web-app/,/lang/ |
| The browser said Authentication complete, but OneConnect still shows Disconnected | 7 | OneConnect was started from an administrator window. Close it completely, start it from the Start menu, and look again. userauth -list on the firewall shows the session |
| Authentication complete, then You are not authorized to log in, for a user who is in the group | 7 | Group mismatch. On the firewall: oidc -savetoken=START, connect again, oidc -savetoken=SHOW, and read groups in the token |
| The same, and the token's groups is right | 7 | The OneConnect server's Groups field must be VPN_GROUP exactly. Check it letter for letter: show Interface OneConnectInterface oc-vpn |
| Connected, but nothing inside answers | 7 | LAN_NET is not behind LAN_IF, or the inside hosts do not route VPN_POOL back through this firewall |
The scripts
All in scripts. Each one explains itself at the top. The numbers in the names are not the step numbers.
| Step | Script | Does |
|---|---|---|
| 1 | 02-make-proxy-cert.sh | Makes a small CA and the proxy's certificate. Uses 02-make-ca.sh |
| 2 | 01-idauth-container.sh | Runs IdAuth in Docker with the licence and a persistent configuration |
| 4 | 07-idauth-fixup.py | Sets the other settings. Safe to run again |
| 5 | 06-idauth-proxy.py, idauth-proxy.service, idauth-proxy-http.service | The proxy, and its two services |
| 5, 6 | fill-sheet.py, sheet-example-letsencrypt.txt | Fills your values into a file |
| 5 | 05-verify-oidc.py | Signs in as a user and checks the token |
| 6 | 03-netwall-letsencrypt.sgs | The firewall objects, one per line. Uploaded to the firewall |
| 7 | 04-windows-client.ps1 | Checks the sign-in page and creates the OneConnect profile. Runs on the PC |
03-netwall-letsencrypt.sgs runs on the firewall and 04-windows-client.ps1 on the PC; the others run on the IdAuth host. 03-netwall-own-ca.sgs, crl-web.service and sheet-example-own-ca.txt belong to the own-CA setup. Ignore them here.
Reference setup
Tested on cOS Core 15.00.06.10 (a NetWall virtual firewall in a public cloud, behind NAT), Clavister IdAuth 7.0.2 in Docker on Debian 13, Samba AD, and OneConnect 3.15.4 on Windows 11. The Windows AD and DNS commands and the AD CS export were also run against Windows Server 2025 AD, in a run of the Windows own-CA guide. All seven steps were followed as written, from an empty IdAuth host and a firewall with the WebUI on 80 and 443. A member of VPN_GROUP connected and reached only LAN_NET on VPN_PORTS. A user outside the group was refused. Both ways back in “Remove it again” were tested. “Turn off Trust all” was tested on IdAuth 7.0.2 in Docker: Test connection said OK; without the CA, and again after a new container, it said Failure.
Not tested: an IdAuth that already serves other applications; a firewall with the public address directly on its outside interface; keytool with an AD CS CA in “Turn off Trust all” (tested with a Samba CA); admins who log in through RADIUS; old IP Rules or rule folders; MFA; an HA firewall; mobile clients; more than one user at a time; rollout to many PCs; the automatic renewal of the Let’s Encrypt certificate; cOS Core versions other than 15.00.06.
Related articles
13 Aug, 2026 sase cloud oidc oneconnect core
28 Sep, 2026 core howto oneconnect oidc phenixid windows ad easyaccess certificate
28 Sep, 2026 core howto oneconnect oidc phenixid windows ad easyaccess linux letsencrypt certificate
4 Jul, 2025 core oneconnect oidc
4 Nov, 2024 oidc core authentication
8 Feb, 2026 sase oneconnect core userauth oidc
28 Sep, 2026 core howto oneconnect oidc phenixid windows ad easyaccess linux certificate
28 Sep, 2026 core howto oneconnect oidc phenixid windows ad easyaccess letsencrypt